
Marketing Automation App Configuration and Workflow Guide
Marketing Cloud: Marketing Automation App Configuration and Workflow Guide
This document provides a comprehensive guide to the Marketing Automation App in CloudOffix, detailing its menu items, critical fields, and an example workflow for creating a marketing automation.
For more information about configuring Marketing Cloud please refer to the Marketing Cloud General Settings Configuration Guide: [ Marketing Cloud General Settings Configuration Guide ]
1. Menu Items
Below are the primary menu items and their functions.
1.1 Campaigns:
Purpose: Lists all marketing automation campaigns that have been created. From here, existing campaigns can be viewed or new ones can be created.
Functionality: Use filters to quickly find running campaigns, or use group by to organize campaigns by Resource Model (e.g., Attendees, Leads/Opportunities, Contacts).
1.2 Segments:
Purpose: Lists all segments that have been created. From here, existing segments can be viewed or new ones can be created.
Functionality: Use filters to see which segments are active/running, or use group by (e.g., group segments by campaigns)
1.3 Reports:
-
Follow-up:
Purpose: Shows the work items processed across all marketing automation campaigns.
Functionality: Use filters to identify failed items (e.g., activities in ‘Exception’ status), or use group by (e.g., group by campaign to see all work items under the related campaigns).
-
Campaign:
Purpose: Provides detailed reporting and analytics for all your marketing automation campaigns.
Functionality: Switch between multiple views (e.g., pivot, bar chart, line chart, graph, or list). Customize reports with different measures (e.g., partner, segment, execution year)
2. Critical Fields
The following fields are critical for effective marketing automation setup:
2.1 Critical Fields - Marketing Automation and Segments Creation
Name: Name of the marketing automation/campaign
-
Mode:
With Manual Confirmation: New participants enter the campaign but do not start the flow automatically.
Normal: The campaign runs automatically. Participants automatically start the journey as soon as they match the segment filter. The system checks eligibility via scheduled cron jobs and enrolls matching participants accordingly.
-
Auto run (checkbox): When checked, the campaign is active and runs continuously.
When unchecked, the campaign is paused.
Use this to temporarily stop a campaign without deleting it.
-
Resource: The resource model that you select for the specific marketing automation to be run.
The selection you have made here has an effect on the segmentation filtering. (e.g., if you select lead/opportunity as your resource, during segmentation when you are creating your filter the model you will be choosing should also attendee.)
Partner Field: References a person, depending on the selected resource. Based on the chosen model, the fields that reference records in the Contacts app will be listed — select one of them. For example, the resource is Lead/Opportunity, the partner field defines which Customer (crm.lead) the target record is linked to, ensuring that emails, activities, and notifications are sent to the correct person. If the record is the partner itself, leave this field empty. This is useful for reporting purposes, via the Campaign Analysis or Campaign Follow-up views.
-
Unique Field: This field prevents the same person from triggering the exact same automation flow multiple times.
If you set a Unique Field: If set, this field will help segments that work in ‘no duplicates’ mode to avoid selecting similar records twice. For example by choosing the ‘email (crm.lead)’ field for Lead/Opportunity you would prevent sending the same campaign to the same email address again.
-
Example: Visitors fill out Contact Us form and their leads are automatically created.
Marketing Automation Flow: Activity 1: Send brochure → Activity 2 (after 2 days): If they did not open the first email ‘Did you review it? Let’s schedule a meeting.’ → Activity 3: If email is opened → Send meeting invite.
-
Unique Field Logic:
Unique Field = Email
Names cannot be unique because multiple people can have the same name and surname. For example, there can be many ‘John Smith’ records in your database. However, an email address is unique to a person. That is why Email should be selected as the Unique Field — it allows the system to correctly identify and distinguish each individual, even if their names are identical.
If the same email submits the form again: The system recognizes the lead. Flow does not restart, the same sequence is not sent again. Even if the name changes, the email keeps the record unique and prevents duplicates.
If you leave Unique Field empty: If not set, the ‘no duplicates’ segments will only avoid selecting the same record again if it entered the campaign previously.
2.2 Tabs
-
Activities tab: The flow builder where you design the full customer journey for the marketing automation:
Example: Send the first email. Send a second email with ‘this’ template 3 days after if the 1st email is not opened.
-
Configuration tab:
-
Send emails: Checkbox option Monday to Sunday. Allows you to decide on which days of the week emails in this campaign are allowed to be sent.
Example: uncheck Saturday & Sunday → no emails will ever go out on weekends, the system will skip those days. Useful to avoid weekend spam.
-
Schedule:
Scheduled in the future: Activate and set exact date/time when the whole campaign should start running.
Timezone: The timezone used for all timing calculations in this marketing automation.
Between: Define allowed sending window each day (e.g., 08:00 – 20:00). Anything outside this window is postponed to the next allowed slot.
-
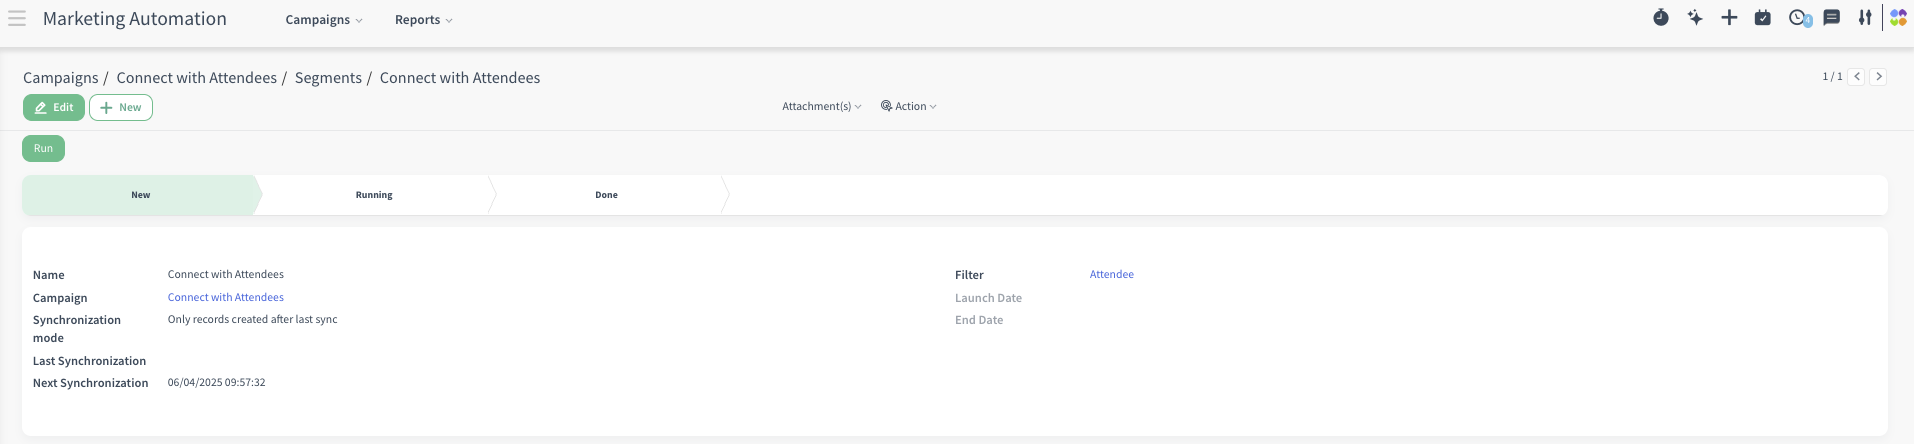
2.3 Segments (Stat button)
Name: Descriptive name of the segment (e.g., ‘Webinar Registrants 2025’).
Automation: A free-text field. Which automation this segment is attached to.
-
Synchronization mode:
Only records created after last sync: Only pulls records that were created as new since the last synchronization (‘new lead’, ‘new event registrations’).
Only records modified after last sync (no duplicates): Pulls every record that was created or changed since the last sync, but automatically skips anyone who already entered the campaign before.
All records (no duplicates): Every time the segment runs, it checks the entire database against the filter from scratch and only adds people who match and have never been in the campaign before.
Last Synchronization: Date & time of the last time the segment pulled in new participants.
Next Synchronization: When the system will automatically check again.
-
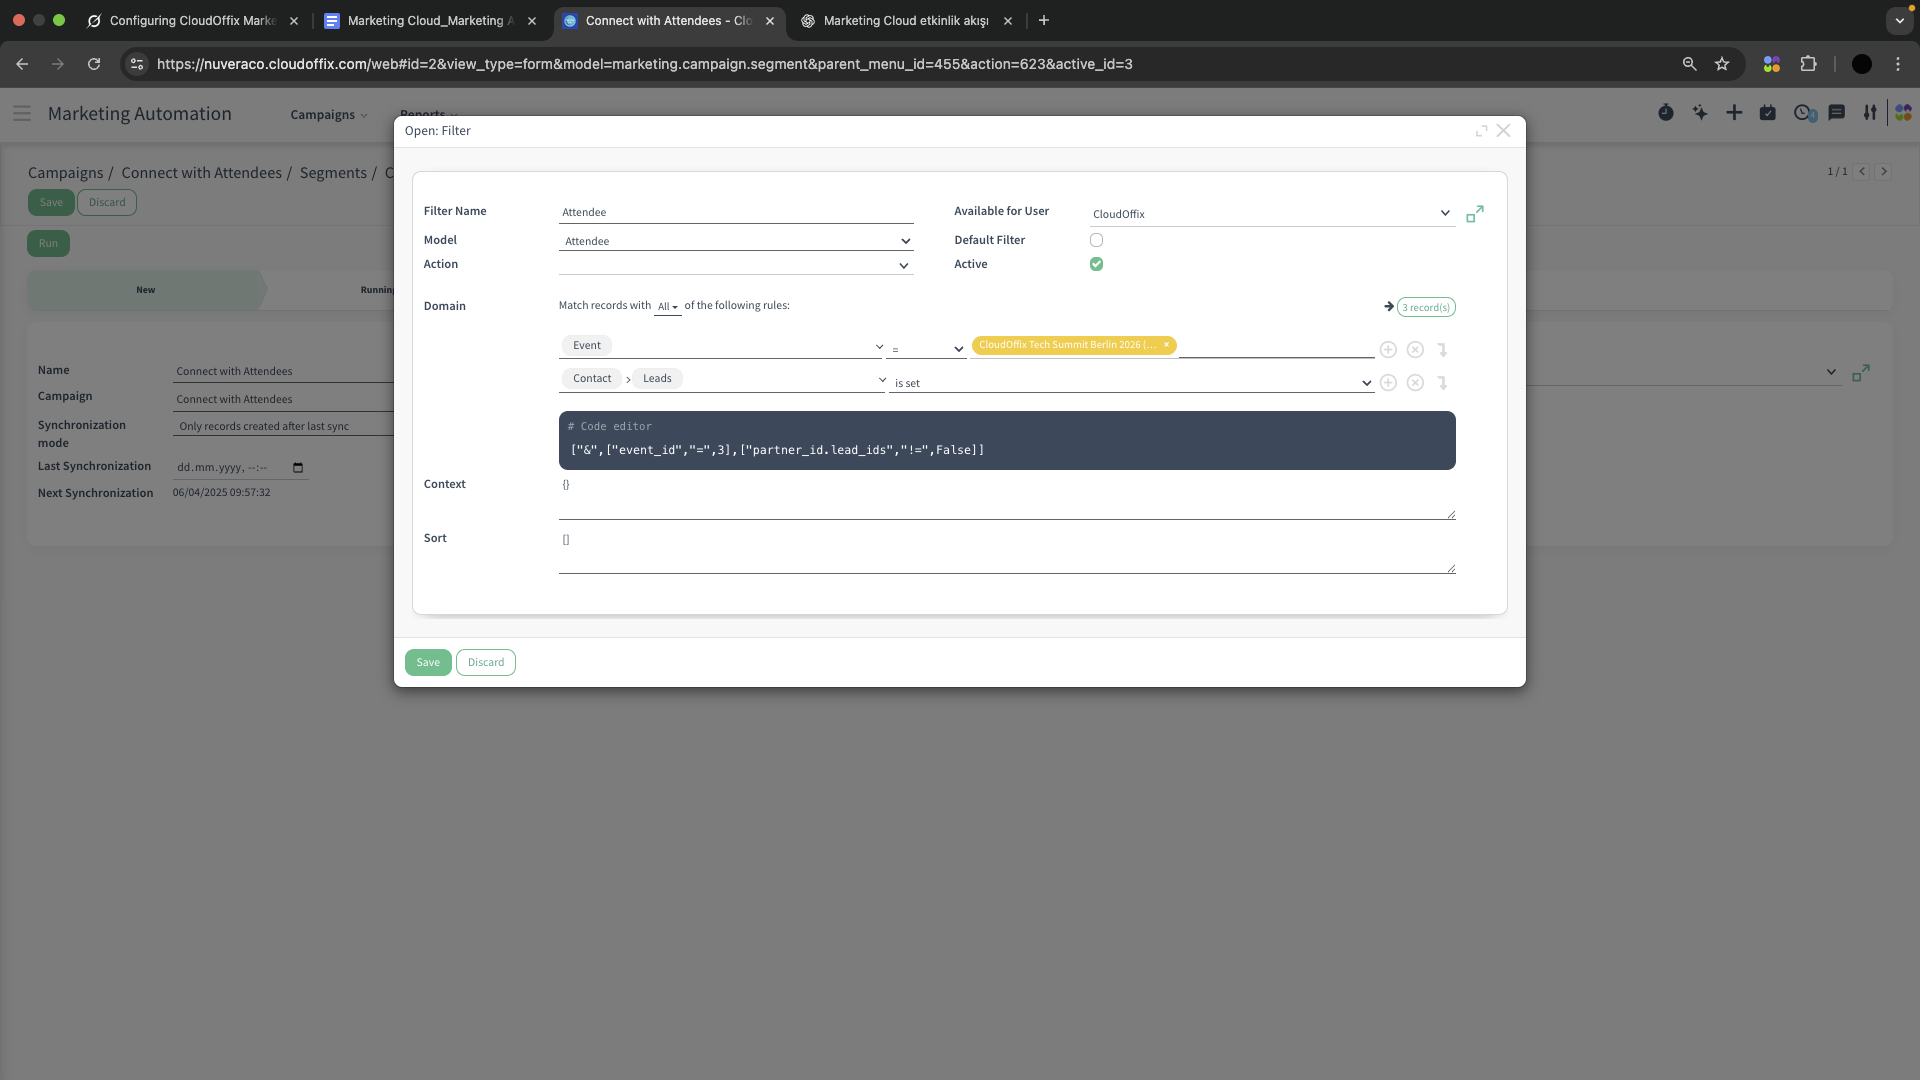
Filter: The domain/filter that defines who enters the campaign.
Example: Event = ‘CloudOffix Summit 2026’ AND Attendee State = Confirmed
The model should be the same or related with your resource on marketing automation, otherwise the system will give you a warning (see the screenshot below).

2.4 Critical Fields - Activities (Tab)
-
Start (checkbox): This is the very first activity that runs as soon as a participant enters the campaign.
If this checkbox is marked, you cannot have triggering conditions for that activity.
-
Type:
Send email: Sends an email with the selected template.
-
Create task: Creates a to-do for the selected assignee (if fixed assignee option is selected) with a due date (e.g., 5 days).
Assigned to:
Fixed assignee: You can choose a user from the ‘Select Assignee’ field. The created will be always assigned to the user that you have chosen on that field.
Use Expression: Click on the calculator icon on the right side of the field and choose a field from the list.
-
Report: The report to generate when this activity is activated.
Example: Report > Foldable badge > the badges will be generated for the attendees
Workflow example: Foldable badges will be generated for people and attached to their attendance record whose attendance statuses are ‘Confirmed’. One day before the event, these badges can be sent to the attendees with mail.
Custom action: Server action / code (advanced).
-
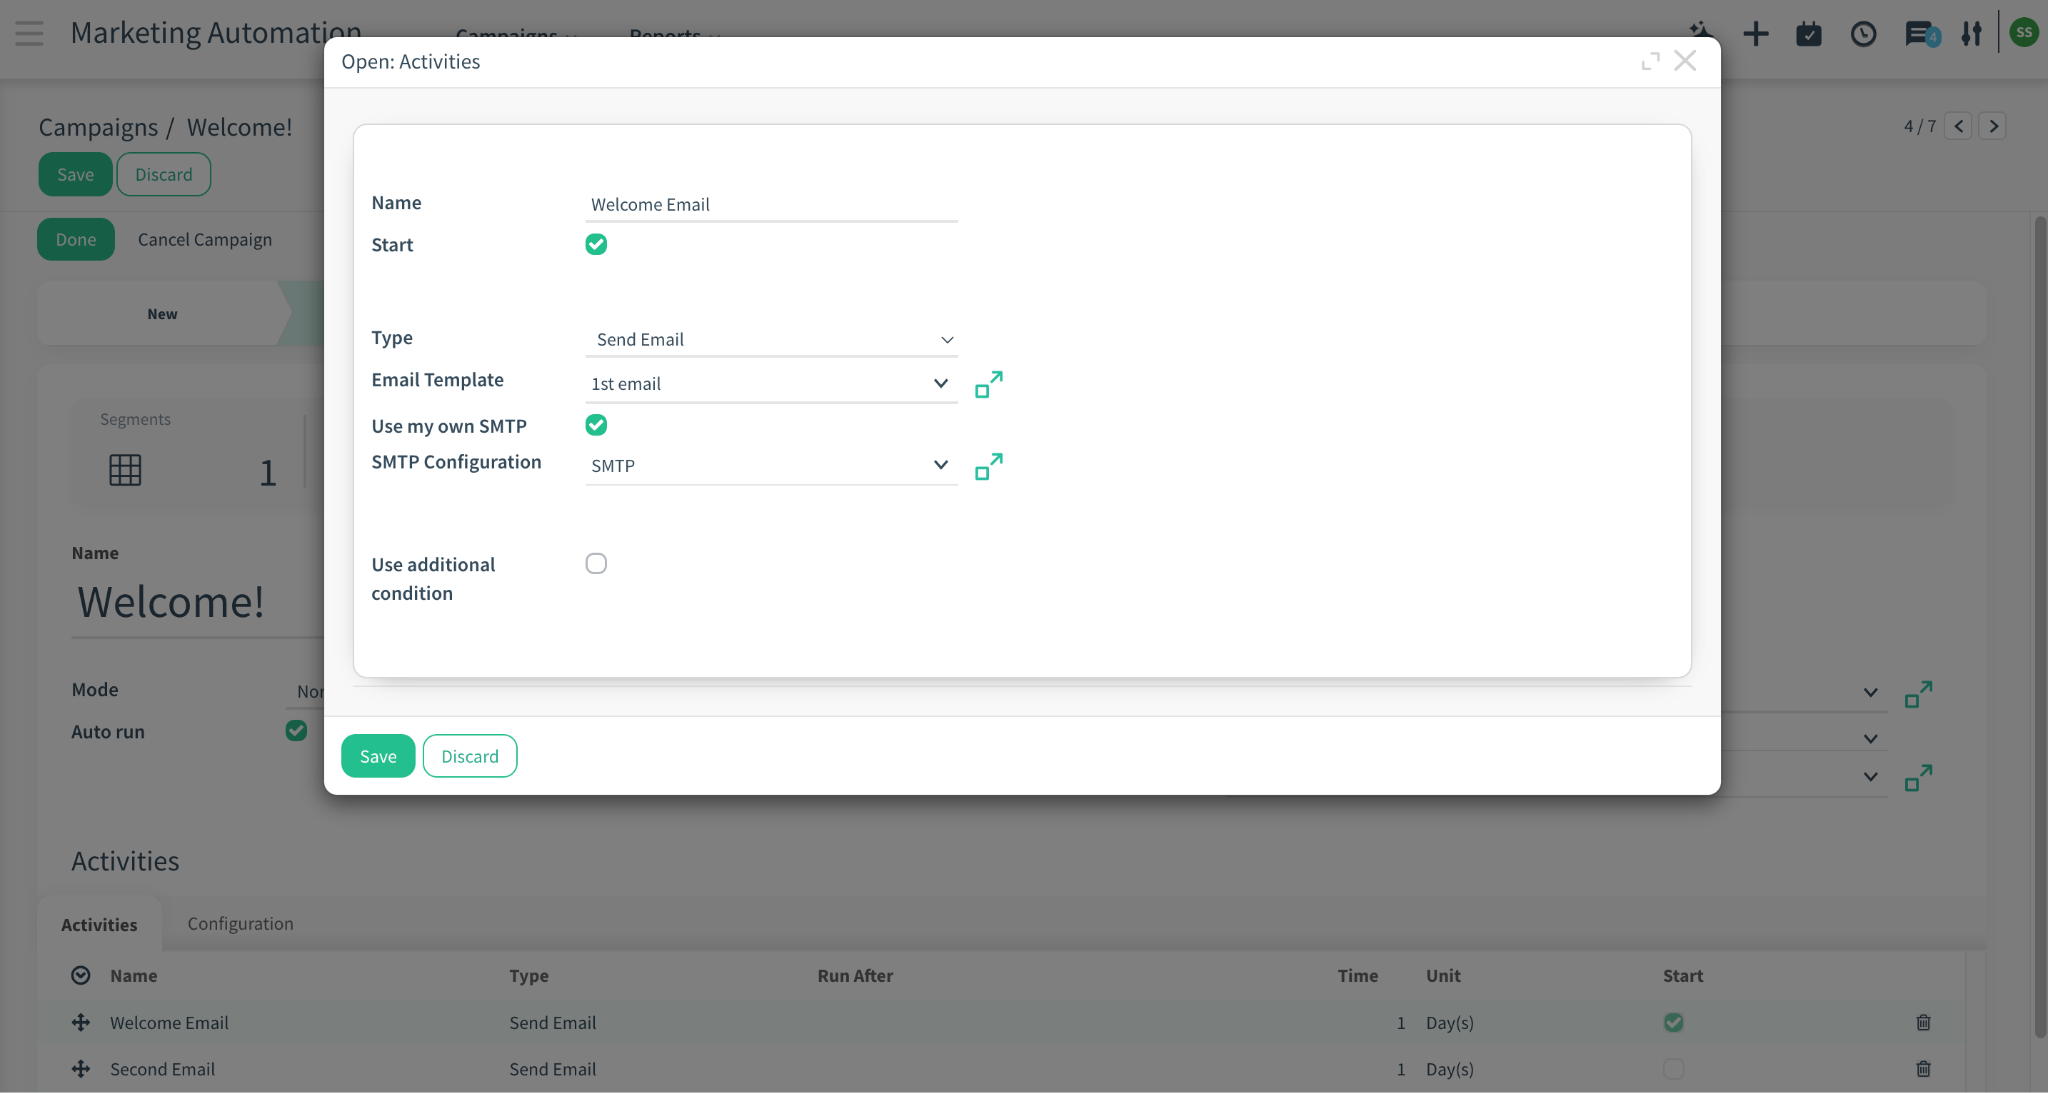
Email Template: The exact email that will be sent in this step.
You simply select a pre-designed email template from the dropdown (e.g., ‘Welcome Email’).
The email templates that are created will be listed under Settings > Technical > Templates. You can create new email templates from here, or directly when creating the activity items (e.g., create and edit).
Only users with Administration/Settings access rights can view the Settings app.
-
Use my own SMTP (checkbox): Mark, if you would like to use one of your SMTP configurations.
SMTP Configuration: Select your SMTP configuration that you would like to use.
For more information regarding SMTP configuration please refer to SMTP Enhancements User Guide
-
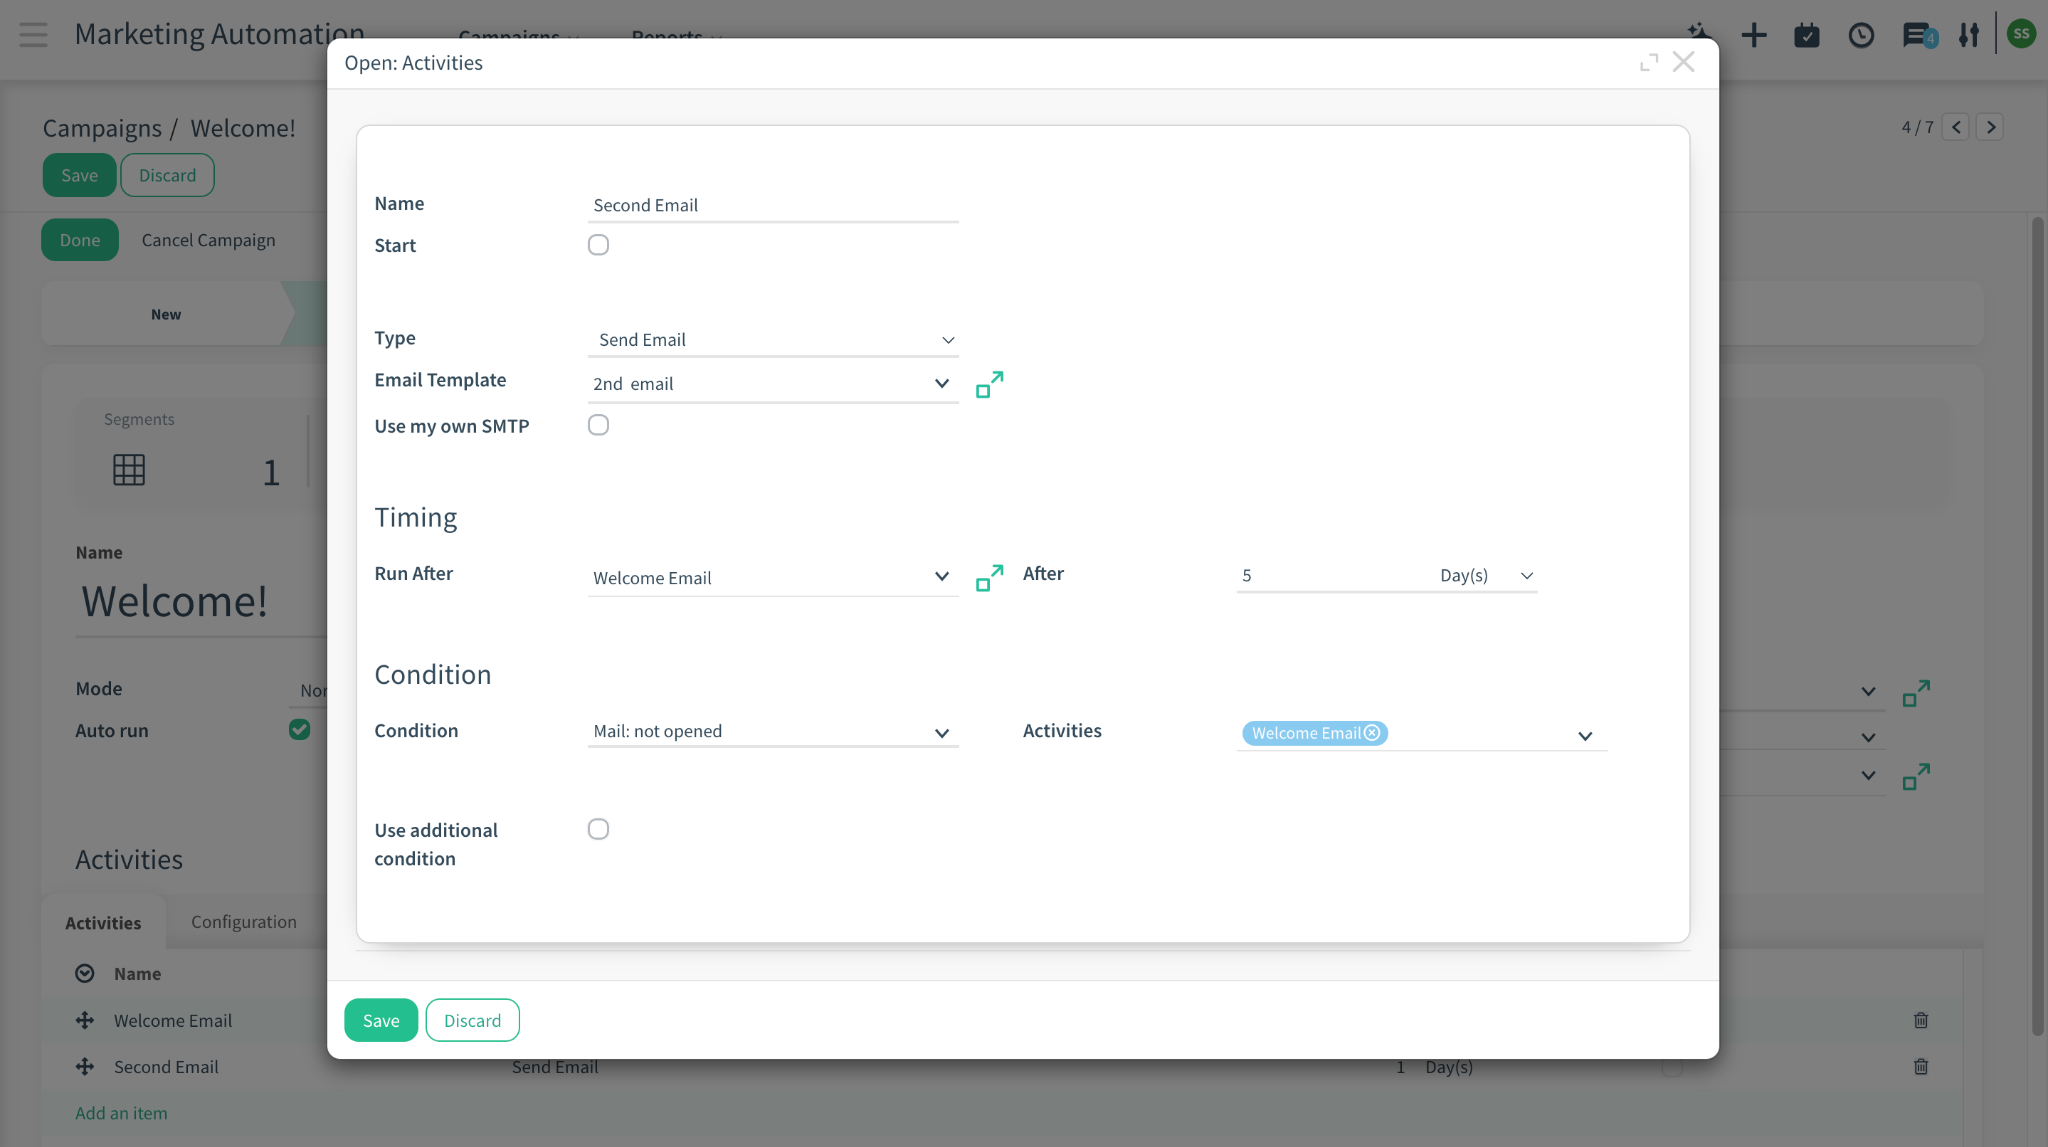
Run After: Defines exactly when (activity-based) this activity will be executed in the flow.
-
After: Defines when (time-based) this activity is executed (e.g., 4 days, 2 hours).
Example: After sending the 1st email, send the 2nd email 5 days after to people that met with the following conditions (e.g., mail not opened).
Example 2 (with no condition selected): Activity 1 → ‘Welcome Email’ (Start)
Activity 2 → ‘Check-in Email’
→ Run After = Welcome Email
→ After = 3 days
Result: Every participant receives the Check-in Email exactly 3 days after they received the Welcome Email.
-
Condition: Makes the email conditional – only sent if the previous email meets the condition such as: not opened, not replied
Useful for follow-up sequences (e.g., ‘If first email not opened after 3 days → send reminder’).
If no condition is set, the email is sent automatically according to the normal timing (Run After, After), exactly like a standard sequence step.
-
Mail activities: Select the activity (e.g., email) to be checked and trigger the mail condition.
Define your first activity, check the box ‘Start’, save it.
Define your second activity and choose the first activity you have created.
This is a many2many area, meaning that you can add more than one activity (e.g., send the 3rd email to people who did not open the 1st and 2nd email).
Continue Checking (checkbox): When checked, CloudOffix keeps re-evaluating the condition (opened, clicked, replied, bounced) for an additional period of time (e.g., for x days) instead of checking only once.
-
Use additional condition (checkbox): If checked, you can add a more advanced or custom condition on top of the basic ‘not opened / not replied’ rule.
Condition Type: Domain vs Code
-
Domain: Condition Domain: Lets you write a domain filter (same style as other filters in CloudOffix).
The available fields come from the model/resource you selected for the automation (e.g., Contact, Lead/Opportunity, Attendee).
When you choose Domain as the Condition Type, you write a more detailed filter (domain) to restrict the basic condition (e.g., ‘not replied’) even further.
Code: Condition: Lets you write a short Python expression to decide whether the activity can be executed.
-
If condition does not met: Choose what happens if the additional condition is never met during the checking period:
Cancel, Delete, Postpone 1 Day
Marketing Automation Creation - Activities (Tab)
Marketing Automation Creation - Segments
3. Stat Buttons of Marketing Automation
-
Segments: Shows the number of segments attached to this campaign (e.g., 3 Segments).
Click → Opens the list of all segments feeding participants into this campaign.
-
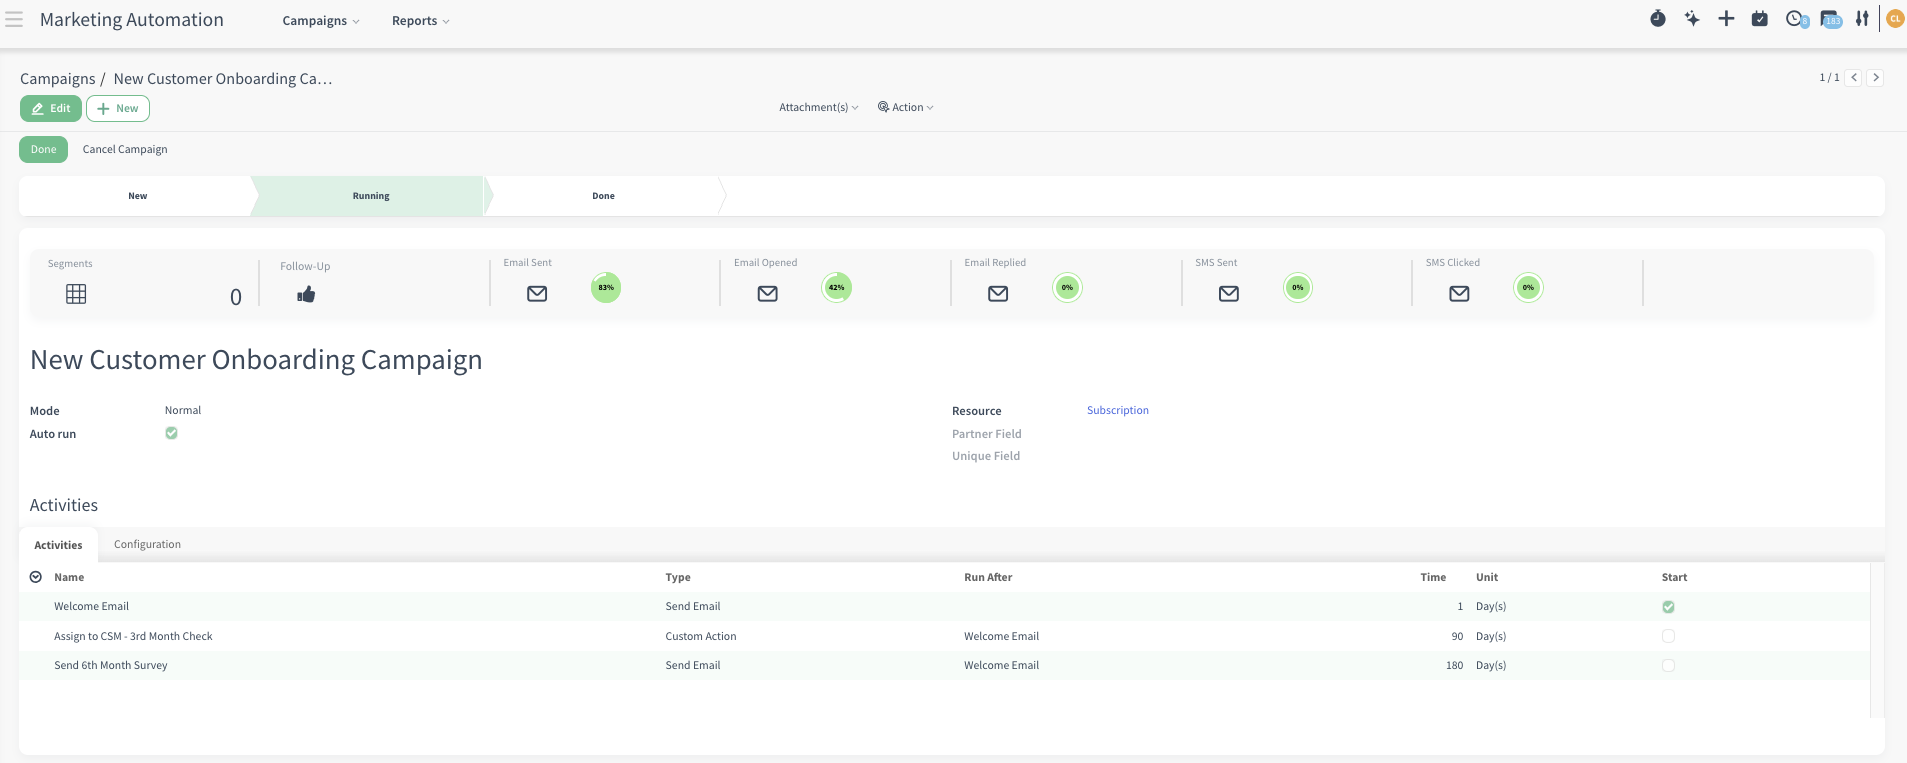
Follow-up: Shows the work items processed in this campaign.
Click → Opens the detailed workitems view for this specific campaign.
Lists every participant and every activity they went through (e.g., ‘Welcome Email’, ‘Assign to CSM – 3rd Month Check’, ‘Send 6th Month Survey’).
Great for auditing exactly what was sent/done to whom and when, troubleshooting missing emails/tasks, or exporting participant history.
Email Sent: Shows the percentage of emails sent.
Email Opened: Shows how many percent of the sent emails were opened.
Email Replied: Shows how many percent of the recipients replied to any email in this campaign.
SMS Sent: Shows the percentage of SMS sent.
SMS Clicked: Shows how many percent of the sent SMS were opened/clicked.
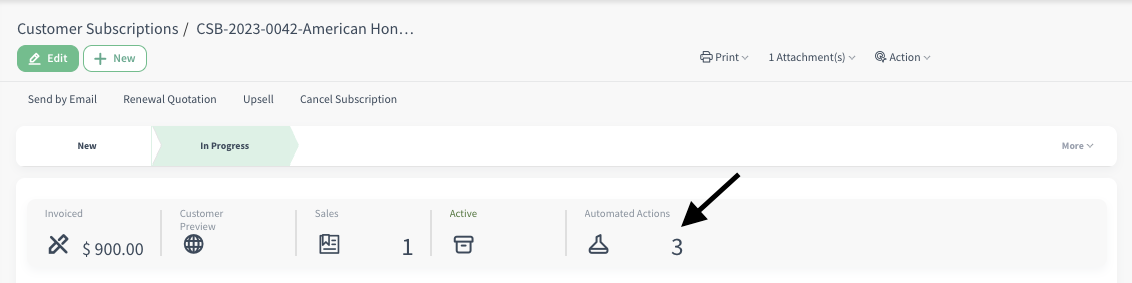
4. Marketing Automation for Subscriptions

5. Example of End-to-End Workflow
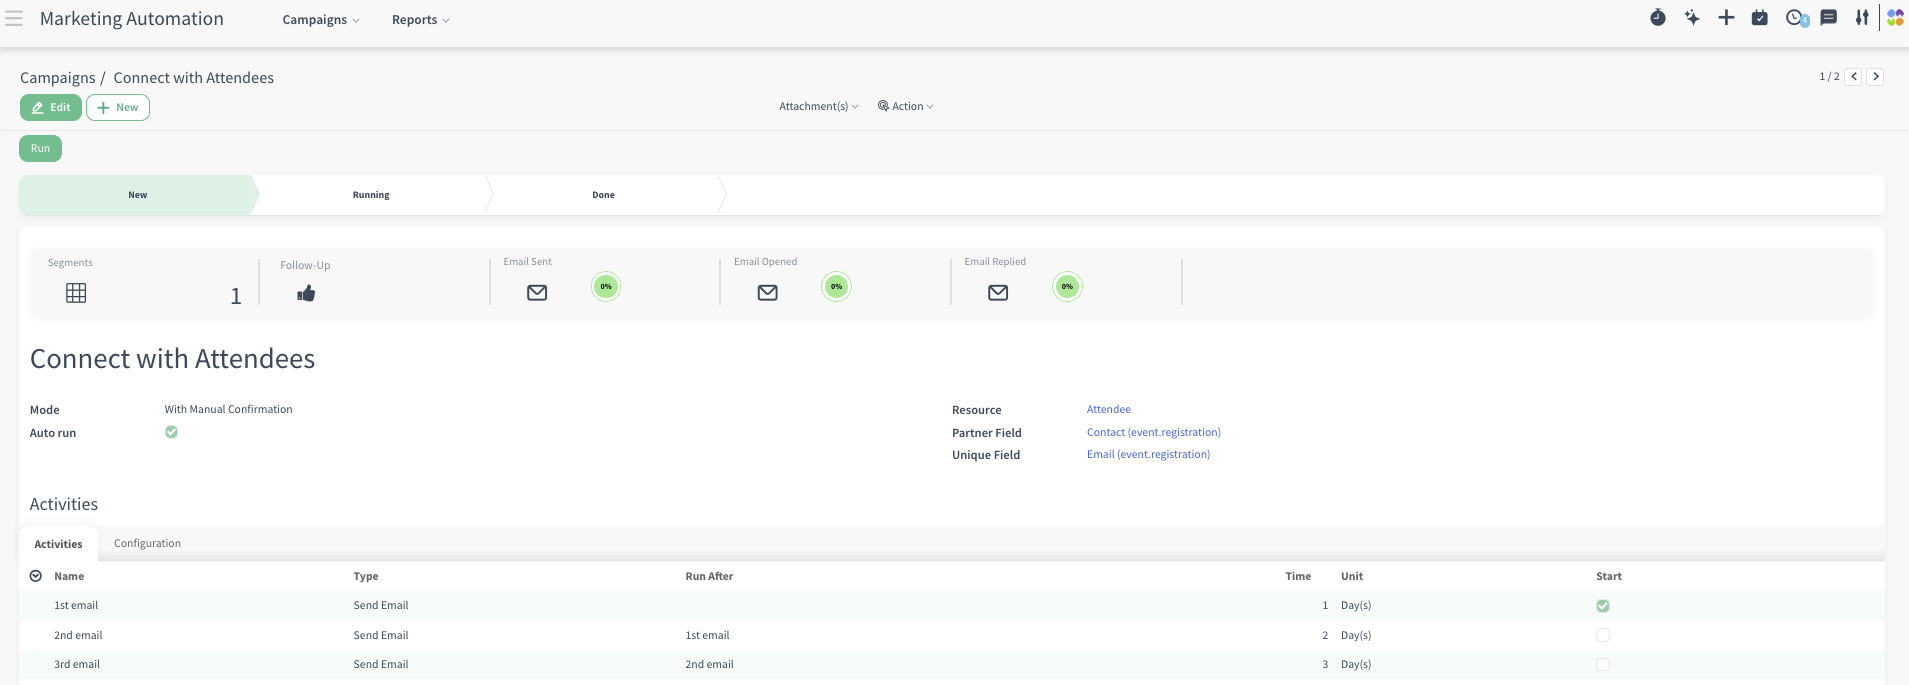
Scenario #1: Event Follow-Up and Lead Nurturing Campaign
CloudOffix Marketing launches a post-event follow-up campaign for attendees of the “CloudOffix Summit 2026.” Everyone who registered and confirmed their attendance is automatically grouped into a segment and added to the campaign. As soon as the campaign starts, participants receive a personalized thank-you email with session highlights and useful resources.
Three days later, those who did not open the first message receive a gentle reminder, while engaged attendees continue through the journey without interruption. Over the following weeks, the campaign delivers educational content, product tips, and invitations to schedule a demo, all within approved sending days and hours to avoid overwhelming recipients. Sales tasks are automatically created for high-interest leads so account managers can follow up personally.
Throughout the campaign, marketing managers monitor performance through dashboards showing email delivery, opens, replies, and participant activity, allowing them to adjust messaging and timing for better engagement. By the end of the automation, CloudOffix has successfully nurtured event leads into qualified opportunities while maintaining full visibility into every interaction.
To see an end-to-end marketing management in action, please refer to the following video: [ Marketing Cloud ]