
Email Marketing App Configuration and Workflow Guide
Marketing Cloud: Email Marketing App Configuration and Workflow Guide
This document provides a comprehensive guide to the Email Marketing App in CloudOffix, detailing the Configuration menu, its menu items, critical fields, and an example workflow for email marketing.
For more information about configuring Marketing Cloud please refer to the Marketing Cloud General Settings Configuration Guide: [ Marketing Cloud General Settings Configuration Guide ]
1. Configuration Menu Overview
The Configuration menu in the Email Marketing App, accessible under Email Marketing App > Configuration, is available to users with Email Marketing / Users access rights. This menu allows administrators to customize settings and manage key components of event management. Below are the primary menu items and their functions.
1.1 Configuration Menu
-
Settings:
Purpose: Central hub for enabling/disabling features and setting global preferences.
-
Campaign Stages:
Purpose: To define the status workflow of marketing campaigns.
Functionality: Typical stages: Draft → In Queue → Sending → Sent → Cancelled. Stages are used in the Campaigns (menu item) kanban view.
-
Campaign Tags:
Purpose: To categorize and filter campaigns (e.g., Newsletter, Product Launch, Black Friday, Webinar Promotion).
Functionality: Tags appear as colored labels on campaigns; unlimited tags can be created and used for filtering.
-
Unsubscription Reasons:
Purpose: To collect feedback when someone unsubscribes.
Functionality: Pre-defined reasons (Too many emails, Not relevant, etc.) appear in the unsubscribe form. Answers are stored under the (Un)subscriptions submenu item.
2. Menu Items
-
Mailings:
-
Mass Mailings:
Purpose: Create and send one-off or bulk/mass emails (newsletters, announcements, promotions).
Functionality: Opens in Kanban view by default (you can also switch to List or Graph views) to track the status of the sent emails (Draft, In Queue, Sending, Sent), dynamic content/email creation, A/B testing, schedule sending, real-time statistics (sent, opened, clicked, bounced), link tracker.
Statistics (e.g.,number of recipients, delivered, opened, clicked) are directly visible on the Kanban card.
-
(Un)subscriptions:
Purpose: Track who subscribed or unsubscribed and why across the entire database.
Functionality: Each record shows the contact, whether they subscribed or unsubscribed, the exact mailing that they did this action, the date/time of the action, and—if they unsubscribed—the reason they chose.
This view lets you quickly filter and group records (e.g., group by reason).
-
-
Contacts:
-
Mailing Lists:
Purpose: Group contacts for targeted campaigns (e.g., VIP customers mailing list).
Functionality: You can add contacts manually, import them.
Different from Contacts app’s contacts. The contact you add does not have to have a contact record inside the Contacts app. Only email is enough. However, you have the option to link it to a contact record (Partner field).
For example, this is ideal for purchased lists.
Once created, when sending a mass mailing, you simply select this list as the recipient group → your email goes directly to everyone in it (Recipients > Mailing List).
Example: Create a ‘VIP Customers’ list → add all high-value contacts → send exclusive offers to just them without emailing everyone else.
Note: If you are also using SMS Marketing, the contact lists (like mailing lists) you have created there will be also listed in the Email Marketing app > Contacts > Mailing lists and vice versa.
-
Contacts:
Purpose: Individual recipients (people) that belong to the mailing list or the ones that are created from here (Email Marketing app > Contacts > Contacts).
It does not display your contacts from the Contacts app. It only displays the ones you have created inside of this model.
You can manually create or export contacts.
Functionality: You can use filters and group by to search quickly and effortlessly (e.g., filter by mailing list, country).
-
-
Campaigns:
Purpose: Group multiple mass mailings into one marketing campaign for better organization and tracking.
Functionality: Opens in Kanban view by default with your custom stages. Each campaign card shows real-time totals directly on the Kanban: number of mailings included, total sent / delivered, opened, clicked, replied counts & percentages. You can simply drag & drop the campaign card between stages to update its status.
Note: Any campaign you newly created in the Email Marketing app automatically appears in the Campaigns app (the separate Campaigns module).
-
Reporting:
Purpose: Provides analytics and insights for mass mailing analytics.
Functionality: Choose between different view options (pivot, bar graph, pie chart, line chart) and use different measures (compare email opening, replied statistics for each campaign).
3. Critical Fields
The following fields are critical for effective email marketing setup and management:
3.1 Critical Fields - Mass Mailing Creation
From: The email address that the email will be sent from.
Subject: Unique identifier name for the email which is visible to recipients and on the Kanban dashboard.
-
Recipients: Options below are not mandatory. You can have your own domain filter without choosing any of the options below.
Applicant: Brings fields from the Applicant model (e.g., AI score, applied job). Ex: Applicants who applied for Sales Manager position and have AI score above 80
Attendee: Brings fields from the Attendee model (e.g., event name, attendee name, attendance status (e.g., confirmed). Ex: Confirmed attendees for the event CloudOffix Partner Days 2025
Contact: Brings fields from the Contact/Partner model (e.g., company name, job position, country). Ex: Contacts whose job position is Sales Director and country is United Kingdom
Event Track: Brings fields from the Event Track model (e.g., speaker name, speaker email, track name, track status (e.g., proposal, cancelled). Ex: Speakers whose track status is ‘Cancelled’ for the CloudOffix Partner Summit 2025 event.
Lead/Opportunity: Brings fields from the Lead/Opportunity model (e.g., expected revenue, stage, probability, type (lead or opportunity), stage (e.g., new, engaging, won)). Ex: Opportunities in ‘Negotiation’ stage with expected revenue > $100,000
Quotation: Brings fields from the Quotation model (e.g., has delivery, status (e.g., quotation sent, sales order, cancelled)). Ex: Quotations created after 20.12.2025 and has a delivery.
Email Statistics: Brings fields from the Email Statistics model (e.g., opened date, clicked date, bounced). Ex: Contacts who received the ‘November Newsletter’ email but did not open it.
Mailing List: Select mailing lists: Select the mailing list group from the drop down list or create a new one.
-
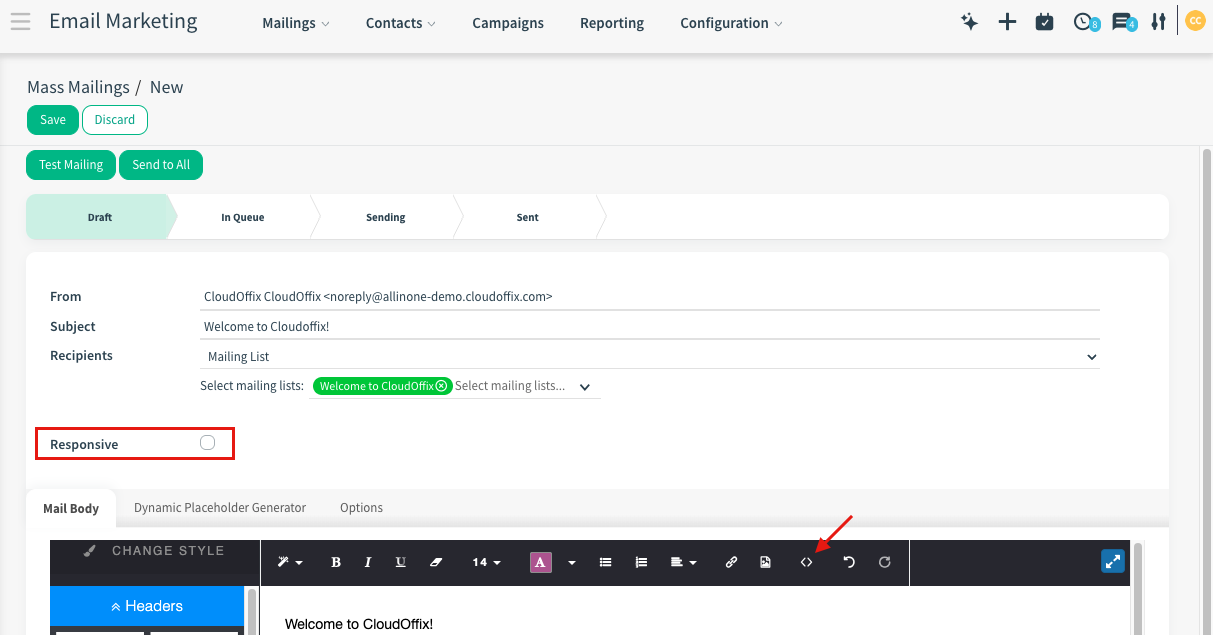
Responsive (checkbox): It is checked by default.
When checked, the templates will be displayed and you can start designing.
If you are importing HTML, remove the checkbox first. Switch to Code View and paste your HTML there.
3.2 Tabs
Mail Body Tab: Design and customize your emails, or choose ready to use templates.
-
Dynamic Placeholder Generator Tab: Makes personalization easy: after choosing your recipient type, this tab lists all available fields and instantly generates the correct placeholder (e.g., ${object.firstname})
Simply copy and paste it into your email body — when the mailing is sent, CloudOffix automatically replaces it with each recipient’s real data.
Ex: ‘Hello ${object.firstname}’ becomes ‘Hello Anna’, ‘Hello Max’, or ‘Hello Sophie' for every individual recipient.
Default value field: Optional field to use if the target field is empty.
3.3 Options
Attachments: Add PDFs, brochures, price lists, or invitations that will be attached to every email.
Keep Archives: If checked, emails stored in the system (uses storage).
-
Reply to: Choose where replies go:
-
Followers of Leads/Applicants: Replies are routed to the lead/applicant followers.
Important: For replies to also arrive in your personal email inbox (the email address you use to log in to your CloudOffix database), the correct setting must be enabled in your user preferences:
Go to the top-right avatar > Preferences > Email Preferences tab > Notification Management > select ‘Handle by Emails and Mobile Notifications’
If this is not set, you will not receive the reply in your email — only inside CloudOffix.
Regardless of the notification preferences:
You will always see the reply as a notification in the Discuss > Inbox.
The reply is stored in the record’s chatter for full history and team visibility.
-
Internal Email Address: Replies are routed to a specific inbox inside CloudOffix using an email alias you have previously created (e.g., marketing@yourcompany.com, europesales@yourcompany.com). Simply select the desired alias from the dropdown list.
Every new email sent to this alias create new record inside of the model (e.g., for a project email alias, new email creates a task)
-
External Email Address: Replies are routed to any external mailbox (e.g., Gmail).
If this option is selected, you cannot track the replied statistics on the stat bar of the mass mail.
-
Schedule in the future: Set a precise date & time for sending instead of sending immediately.
Campaign: Link this mailing to a marketing campaign (e.g., ‘Product Launch 2026’).
-
A/B Testing:
Create different versions of the mail (different subject lines, content, or senders) and define what percentage of recipients will receive each version. Link the versions you have created to the same campaign.
System randomly splits list 50/50 - Each contact gets only one email (no duplicates).
Default: 100 (send to all). Set to 50 to send to random 50%.
3.4 Buttons
-
Test Mailing Button: If you would like to test your email before sending it to your actual recipient, click ‘Test Mailing’.
The system will allow you to write email address(es) as recipient(s) to send your mail for testing.
Send a sample email for testing purpose to the email address(es) below (comma-separated list) (e.g., anna@cloudoffix.com , breton@cloudoffix.com).
Send to All: The mail will be sent to all recipients you have defined.

Note: You do not need to manually create tracked links through the Link Tracker for SMS and Email Marketing. CloudOffix already handles this automatically for you. Simply paste your original URL into the message, and the system will convert it into a tracked link behind the scenes.
3.5 Critical Fields - Mailing List Creation
Mailing List: The name of the mailing list.
-
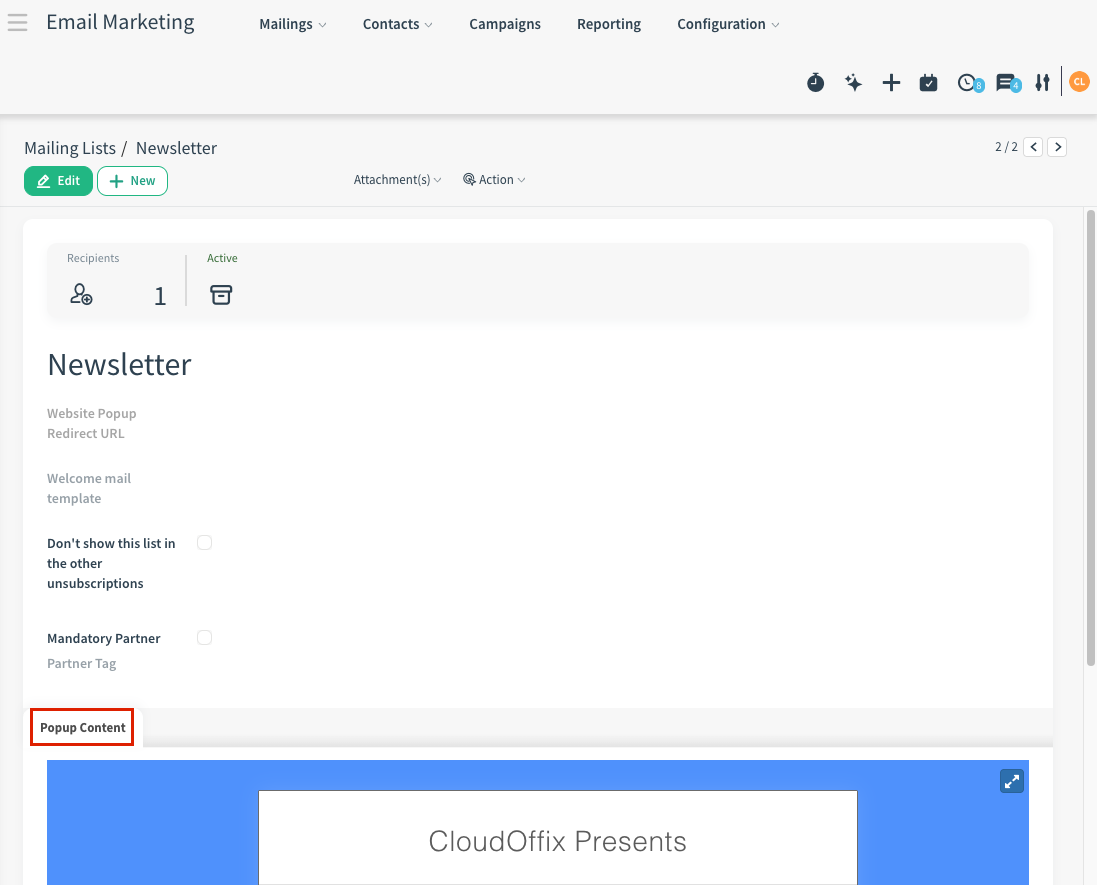
Website Popup Redirect URL: The full web page URL where visitors are redirected after they successfully subscribe via the website popup.
In the general settings of the Email Marketing app (Email Marketing app > Configuration > Settings), ‘Website Popup’ option should be enabled to view this tab.
Welcome mail template: Mail template to be sent when a contact is subscribed from the website.
Don't show this list in the other unsubscriptions: When this box is checked, the current mailing list will not appear in the ‘Is there any other mailing list you want to leave?’ section that is displayed during unsubscription from a different list.
Mandatory Partner: When this box is checked, every new contact you have created will have a contact record in the Contacts app. The contact in the mailing list will be automatically linked to this partner/contact record (Partner field).
Partner Tag: If you define a tag here, every new contact created in the ‘Contacts’ app will have this tag automatically on their contacts card (Tags field). The same tag is also added to the corresponding mailing list record.
Recipients Stat Button: By clicking this stat button, you can open the list of all recipients that you have created in the relative mailing list, and create new ones by clicking the ‘New’ button.
3.6 Tab
-
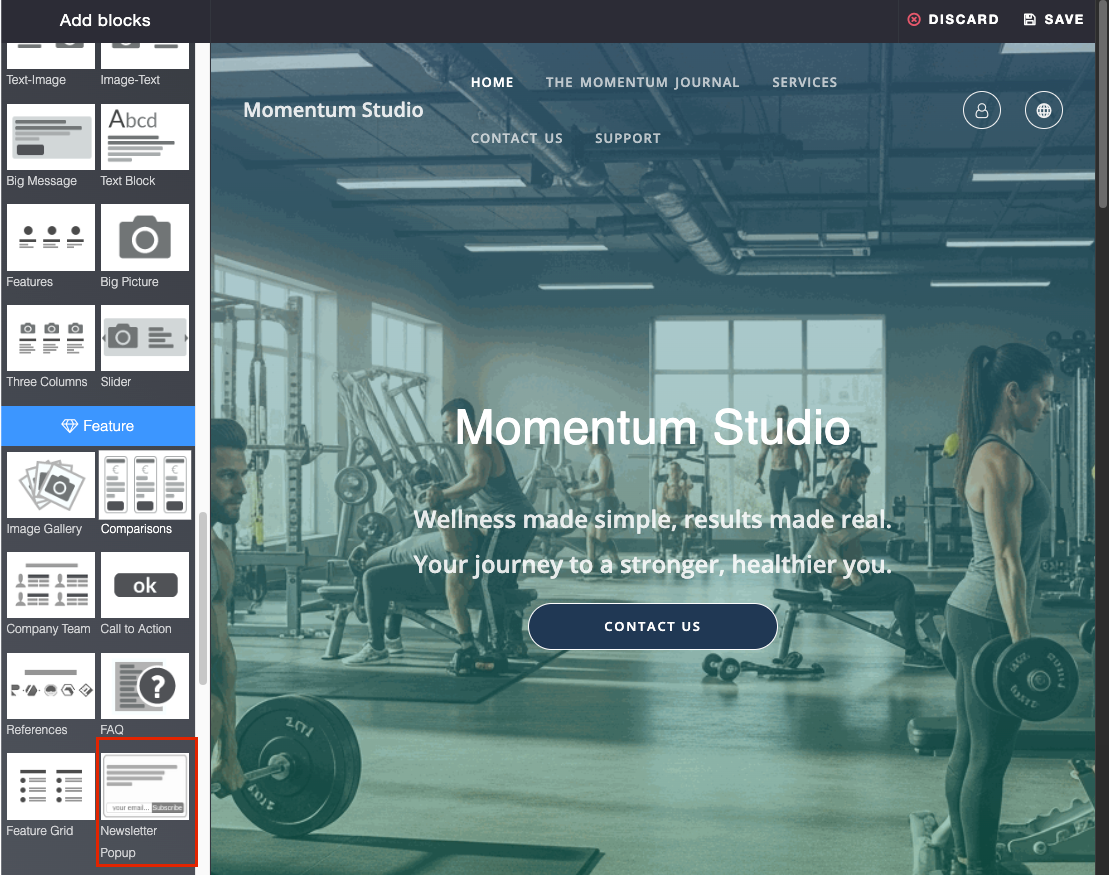
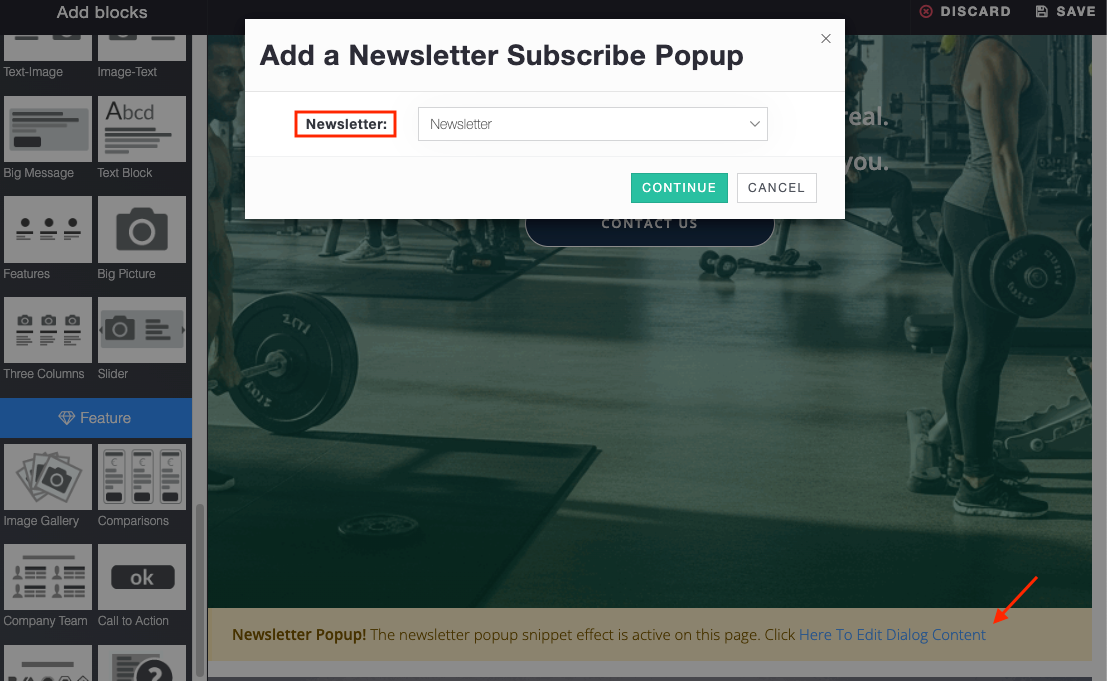
Popup Content Tab: Design and customize the website subscription popup that is linked to this mailing list.
If the ‘Website Popup’ option is enabled from the Email Marketing’s settings.
After enabling this option, go to the Website and click ‘Edit’. Drag & drop the ‘Newsletter Popup’ block from the left panel onto the page, and select the relevant mailing list. The popup design configured for that mailing list will be displayed when the popup appears. Wherever the block is placed, the popup will appear on that specific page.
Subscribers who register through the popup are added to the selected mailing list.
3.7 Critical Fields - Mass Mailing Campaign Creation
-
Campaign Name: The name of the campaign.
It will create a new campaign record inside of the separate Campaigns app with this name.
Responsible: The responsible person for the mass mailing campaign.
Tags: Campaign tags you would like to add to this campaign.
-
Allow A/B Testing: If checked, recipients will be mailed only once for the whole campaign. This lets you send different mailings to randomly selected recipients and test the effectiveness of the mailings, without causing duplicate messages.
On the Options tab, the A/B Testing percentage field lets you define what portion of contacts will be randomly selected and sent the email.
3.8 Tabs
-
Tracking Tab:
Medium: The delivery method (e.g., email, banner ads, paid ads).
Source: This is the link source (e.g., search engine, name of email list)
Related Mailings Tab: List of mailings that are related to the mailing campaign.
3.9 Buttons
-
Send New Mass Mailing: Opens the mailing editor where you can design the mail for your campaign.
In the Options tab, the campaign will be automatically linked to the mail.
-
Send New A/B Testing Mass Mailing: When clicked, the mass mailing form opens. On the Options tab, the A/B Testing percentage (field) is set to 10% by default and can be edited.
A/B Testing percentage: Percentage of the contacts that will be mailed. Recipients will be taken randomly.
3.10 Critical Fields - Unsubscription Reasons Creation
Name: The name that will be displayed to people when they are unsubscribing (e.g., ‘I’m not interested’).
-
Details Required Checkbox: When this is checked, the person who is subscribing should type a free-text explanation as their unsubscription reason.
Ideal for ‘Other reasons’ option in the unsubscription reasons list — if none of the predefined reasons fit, the person can write their own reason, and you’ll always get context instead of a blank ‘Other reasons’.
3.11 Critical Fields - Contact Creation (for Mailing List)
Email (mandatory): The email address of the recipient/person.
-
Partner (optional): If you would like to link the contact to an actual contact/partner record (in the Contacts app), you can either select from the contacts list or create a new one.
Note: If the ‘Mandatory Partner’ field is checked on the mailing list itself, every new contact you have created inside of that mailing list will have an actual contact record automatically in the Contacts app.
4. Example of End-to-End Workflow
Scenario #1: Launching a New Product to the Right Audience
CloudOffix is preparing to launch its new AI-powered Sales Assistant and wants to generate excitement while engaging the most relevant audience segments. The marketing team creates a campaign called “AI Sales Assistant Launch 2026” and tags it as Product Launch for easy tracking. They build several targeted mailing lists—one for existing enterprise customers, another for qualified sales leads, and a third for event attendees who previously joined CloudOffix webinars. Using dynamic placeholders, each email greets recipients by name and references their company, creating a personalized experience at scale. To maximize impact, the team runs A/B testing on two subject lines to see which version drives higher open rates, while scheduling the send for peak engagement hours. During the campaign, real-time Kanban cards and reports reveal how many emails were delivered, opened, and clicked, allowing marketers to adjust follow-up messages for contacts who did not engage the first time.
New prospects who sign up through the website popup are automatically added to a dedicated mailing list and receive a welcome email with product highlights, while unsubscribe feedback is collected to refine future messaging. By the end of the campaign, the marketing team has a clear view of performance across all mailings, understands which audience segments responded best, and can confidently plan the next wave of communications using data-driven insights rather than guesswork.
To see an end-to-end marketing management in action, please refer to the following video: [ Marketing Cloud ]