
Events App Configuration and Workflow Guide
Marketing Cloud: Events App Configuration and Workflow Guide
This document provides a comprehensive guide to the Events App in CloudOffix, detailing the Configuration menu, its menu items, critical fields, and an example workflow for creating and managing an event.
For more information about configuring Marketing Cloud please refer to the Marketing Cloud General Settings Configuration Guide: [ Marketing Cloud General Settings Configuration Guide ]
1. Configuration Menu Overview
The Configuration menu in the Events App, accessible under Events App > Configuration, is available to users with Events / Manager access rights. This menu allows administrators to customize settings and manage key components of event management. Below are the primary menu items and their functions.
1.1 Configuration Menu
-
Settings:
Purpose: Central hub for enabling/disabling features and setting global preferences.
-
Event Categories:
Purpose: To classify and group events by type (Conference, Webinar, Training, Trade Show, Workshop, Meetup, etc.).
Functionality: Helps in filtering events based on categories and applies different templates.
-
Mail Schedulers:
Purpose: A list of automated email communications related to event registrations, such as confirmation emails, reminders before the event, thank-you messages after the event, or follow-up surveys. This ensures timely, consistent messaging without manual sending.
Functionality: You can track exactly which emails have been sent, at what time, and to which registrants — all records are logged in the scheduler list for easy monitoring.
-
Event Answers:
Purpose: Store answers from event registration questions across multiple events for every person. It opens with the ‘Partner’ group by filter which can be removed. It groups answers based on the Company name entered when registering for the event.
Functionality: You can apply filters, grouping, to search quickly and effortlessly.
-
Locations:
Purpose: To define and reuse of rooms/locations. Locations created here are the rooms used only for tracks. These do not have a separate street address because they are inside the main location.
The rooms/locations you have defined will be displayed on the website, if you checked the options ‘Website Menu > Tracks on Website’.
The main Event → Location field holds the overall location address (e.g., ‘Istanbul Congress Center’ – this is shown on the website map and invitations).
Functionality: Once created, when you are creating a track it can be selected from the dropdown list (‘Room’ field). You can also create a new location on the fly directly from the track form (via ‘Create and Edit…’). However, only users with Events / Manager access rights are allowed to create or edit Locations — regular Event Users will see the dropdown but cannot add new ones.
-
Sponsor Types:
Purpose: To categorize event sponsors (Platinum, Gold, Silver).
Functionality: Used on the event website to display sponsor logos with the correct level/label and ordering.
-
Track Tags:
Purpose: To tag and filter sessions/tracks by topic or theme.
Functionality: Examples: ‘Marketing’, ‘Technical’, ‘Beginner’, ‘AI’, ‘Hands-on’. Helps attendees filter the agenda and creates tag clouds on the website.
-
Track Stages:
Purpose: To define the status workflow of a proposed or confirmed session.
Functionality: Typical stages: Proposed → Confirmed → Announced → Published → Cancelled. Can be marked as an accepted or canceled stage and define automatic email templates to send on the selected stage.
2. Menu Items
-
Events:
Purpose: Central place to create and manage all events.
Functionality: Create new events (webinars, conferences, trainings), set dates, assign organizers, publish to website, and monitor registrations. In the Kanban view, for each event, view the event date, expected and confirmed attendees.
-
Attendees:
Purpose: To view and manage everyone who registered for any event.
Functionality: Search across all events, use filters, group by options.
-
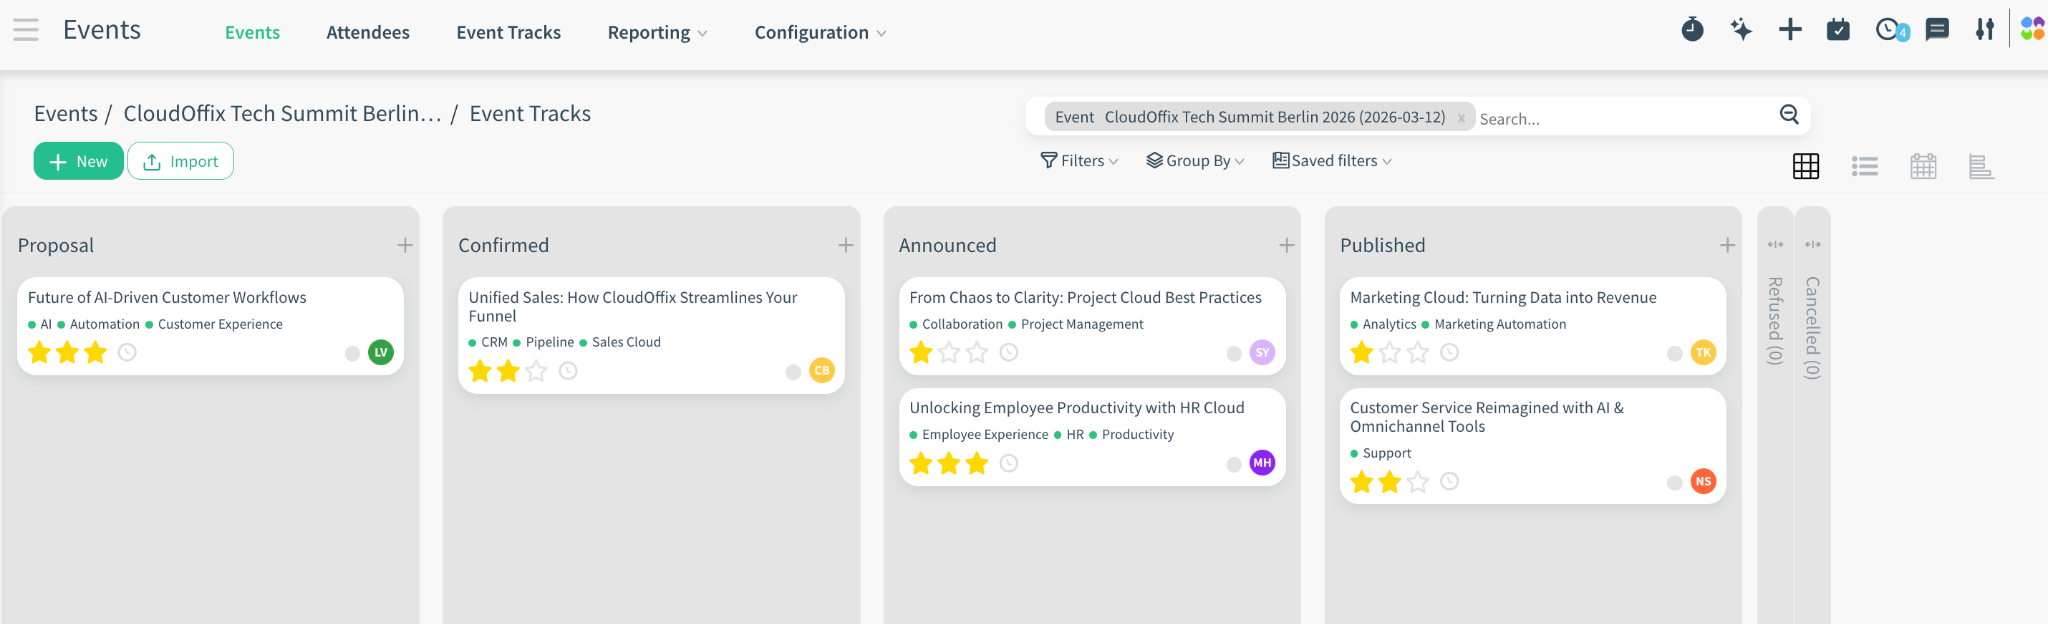
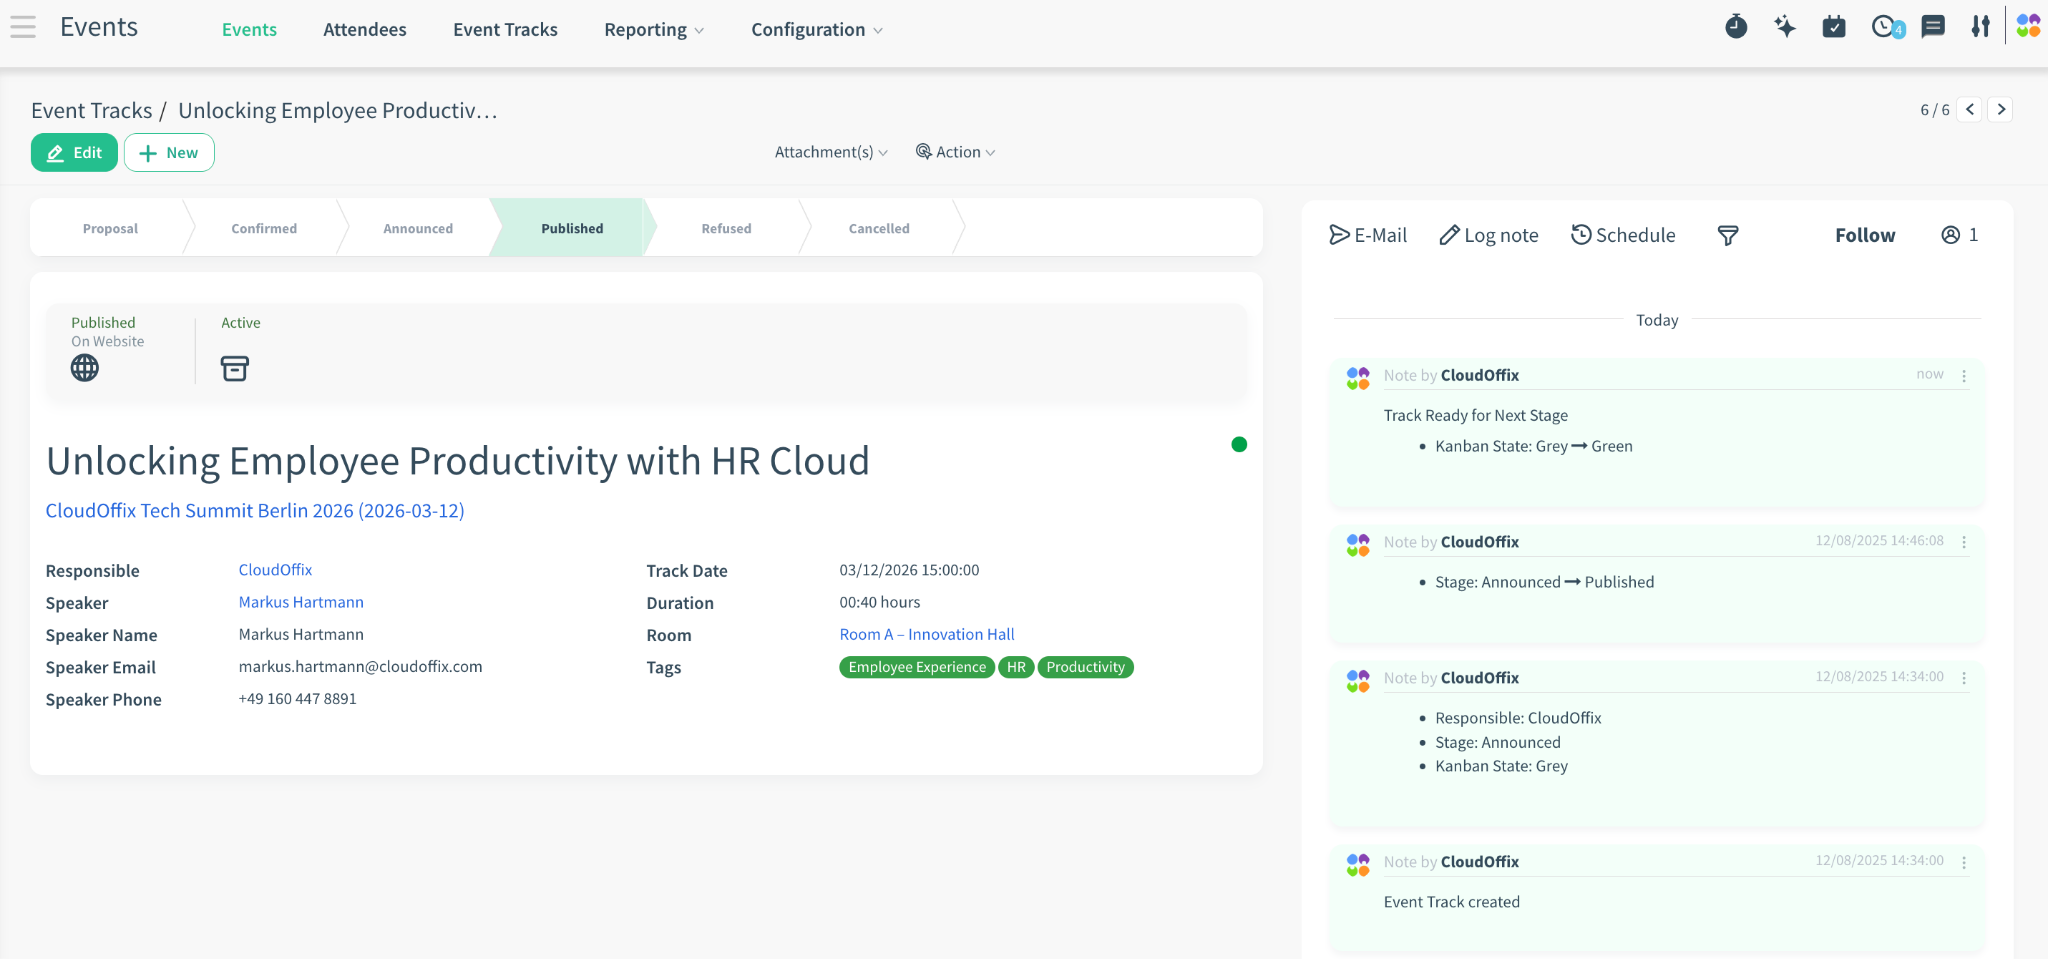
Event Tracks:
Purpose: To manage individual sessions, speeches, or workshops inside an event. Displays all the ones that are created for any event.
Functionality: Define speaker, time slot, room, change stages on the kanban etc. Group them and use filters (e.g., group by event, date, filter by tags, etc.) for quick and effortless search.
-
Reporting:
Purpose: Provides analytics and insights for event performance.
Functionality: Accessible only to Events / Manager users.
Events: Offers customizable metrics (e.g., location, country, twitter hashtag) and provides multiple view options, including pivot, bar chart, pie chart, and line chart, for comprehensive event analysis.
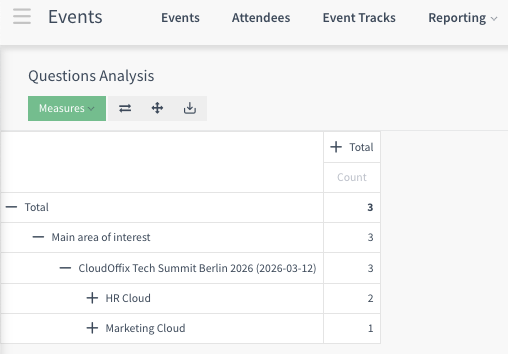
Questions: Offers customizable metrics (e.g., answer, event, question) and provides multiple view options, including pivot, bar chart, pie chart, and line chart, for comprehensive question analysis.
3. Critical Fields
The following fields are critical for effective event setup and management:
3.1 Critical Fields - Event Creation
Note: Enabling ‘Ticket’ from the settings will automatically enable the ‘Online Ticketing’ option and disabling will disable the ‘Online Ticketing’ option.
If the ‘Online Ticketing’ option is disabled, the tickets cannot be sold online. On the event website, registration becomes free for attendees.
If you would like to sell tickets for your event, please enable both ‘Ticket’ and ‘Online Ticketing’ options from the Event app’s settings.
Event Name: Unique identifier for the event, visible in reports and dashboards. Appears as the main title on the website. Use a clear, customer-facing name (e.g., ‘CloudOffix Partner Summit 2026’).
-
Checkboxes:
Online: Mark as checked if the event is fully virtual (e.g., Zoom).
Website Menu: Enabling this checkbox makes the Tracks and Track Proposal checkboxes visible.
Track on Website: Displays the full agenda/schedule (tracks & sessions) on the public event page.
Track Proposals on Website: Speakers who would like to participate in the event as talkers can submit their talk proposals along with their biography and talk introduction or people who would like to propose talkers for the event can fill out the form on the website.
-
Organizer: The company or person organizing the event. Defines who is publicly presented as the organizer. You can select any Partner/Contact from your database (a company, an individual person).
The information about the selected contact (e.g., email, phone) will be visually displayed on the public event page in the 'Organizer' section.
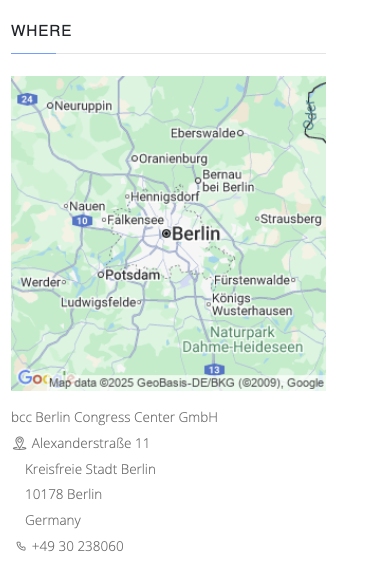
Location: Physical venue, if not marked as online. On the website, a map view will be shown since CloudOffix has an integration with Google Maps.
-
Company: This field determines which company in your database owns the event (important in multi-company environments). If your CloudOffix database has multiple companies defined (parent company + subsidiaries, etc.), all of them will appear in the dropdown here. You can select the company that is responsible for this event.
Note: The Company field does not control what visitors see as the organizer on the public event page. What is actually displayed in the ‘Organizer’ section of the website is taken from the Organizer field (the partner/company you select above the Company field). So even if the internal Company is ‘CloudOffix GmbH.’, you can still set Organizer = ‘CloudOffix Global’ and the website will show the information of ‘CloudOffix Global’.
Responsible: The user that is in charge of the event.
Start Date and End Date: Exact date and time the event begins and ends. Based on this date, defined scheduled emails will be sent (e.g., Send a reminder email 1 day/1hour before the event).
Timezone for registration page: Extremely important! Defines which timezone is shown to visitors on the website. Always set this correctly—mismatches cause confusion and no-shows.
Category: Assigns the event type (Conference, Webinar, Training, etc.), and applies different templates.
Twitter Hashtag: Official hashtag (e.g., #CloudOffixSummit2026). Automatically added to the website and suggested in social sharing buttons.
-
Autoconfirm Registrations:
If enabled → registrations are confirmed immediately, and automatically.
If disabled → registrations stay ‘Confirm’ and someone must manually confirm each one.
Minimum Attendees: Sets the minimum number required for the event to proceed (optional).
-
Maximum Attendees:
Limited: Hard limit on total registrations (optional).
Unlimited: No limit on total registrations.
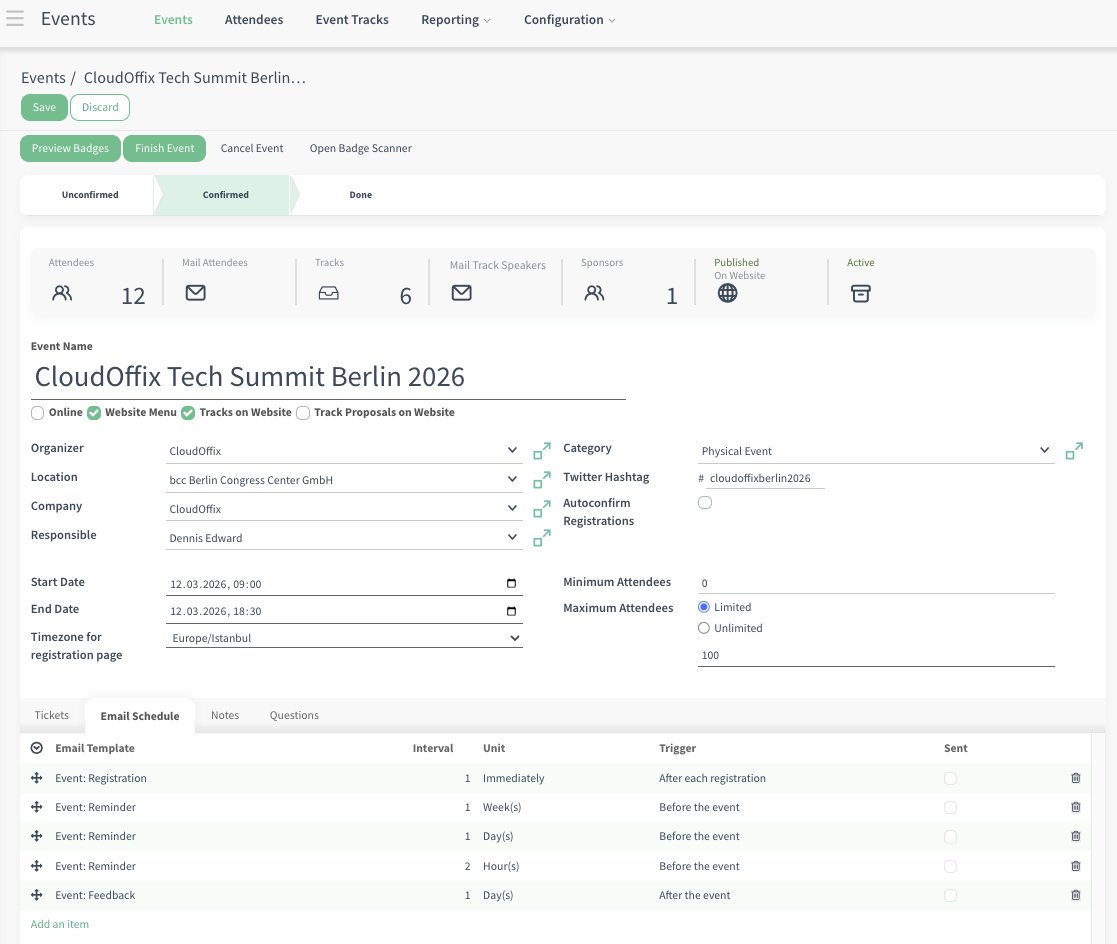
3.2 Event Tabs
-
Tickets tab: Create one or multiple tickets, Set price, end sales dates, maximum available seats etc. If no tickets are created → registration is free.

-
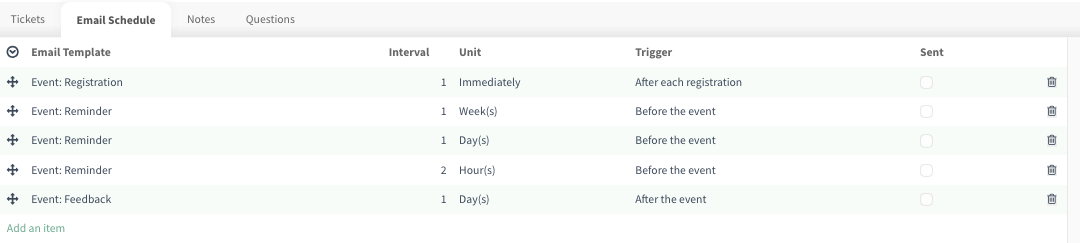
Email Schedule tab: Automate all communication with registrants (e.g., confirmation, reminders, thank-you, feedback).
The email templates that are created will be listed under Settings > Technical > Templates. You can create new email templates from here, or directly when creating the email schedule items (e.g., create and edit).
Only users with Administration/Settings access rights can view the Settings app.
Notes tab: Internal communication and instructions for the event team.
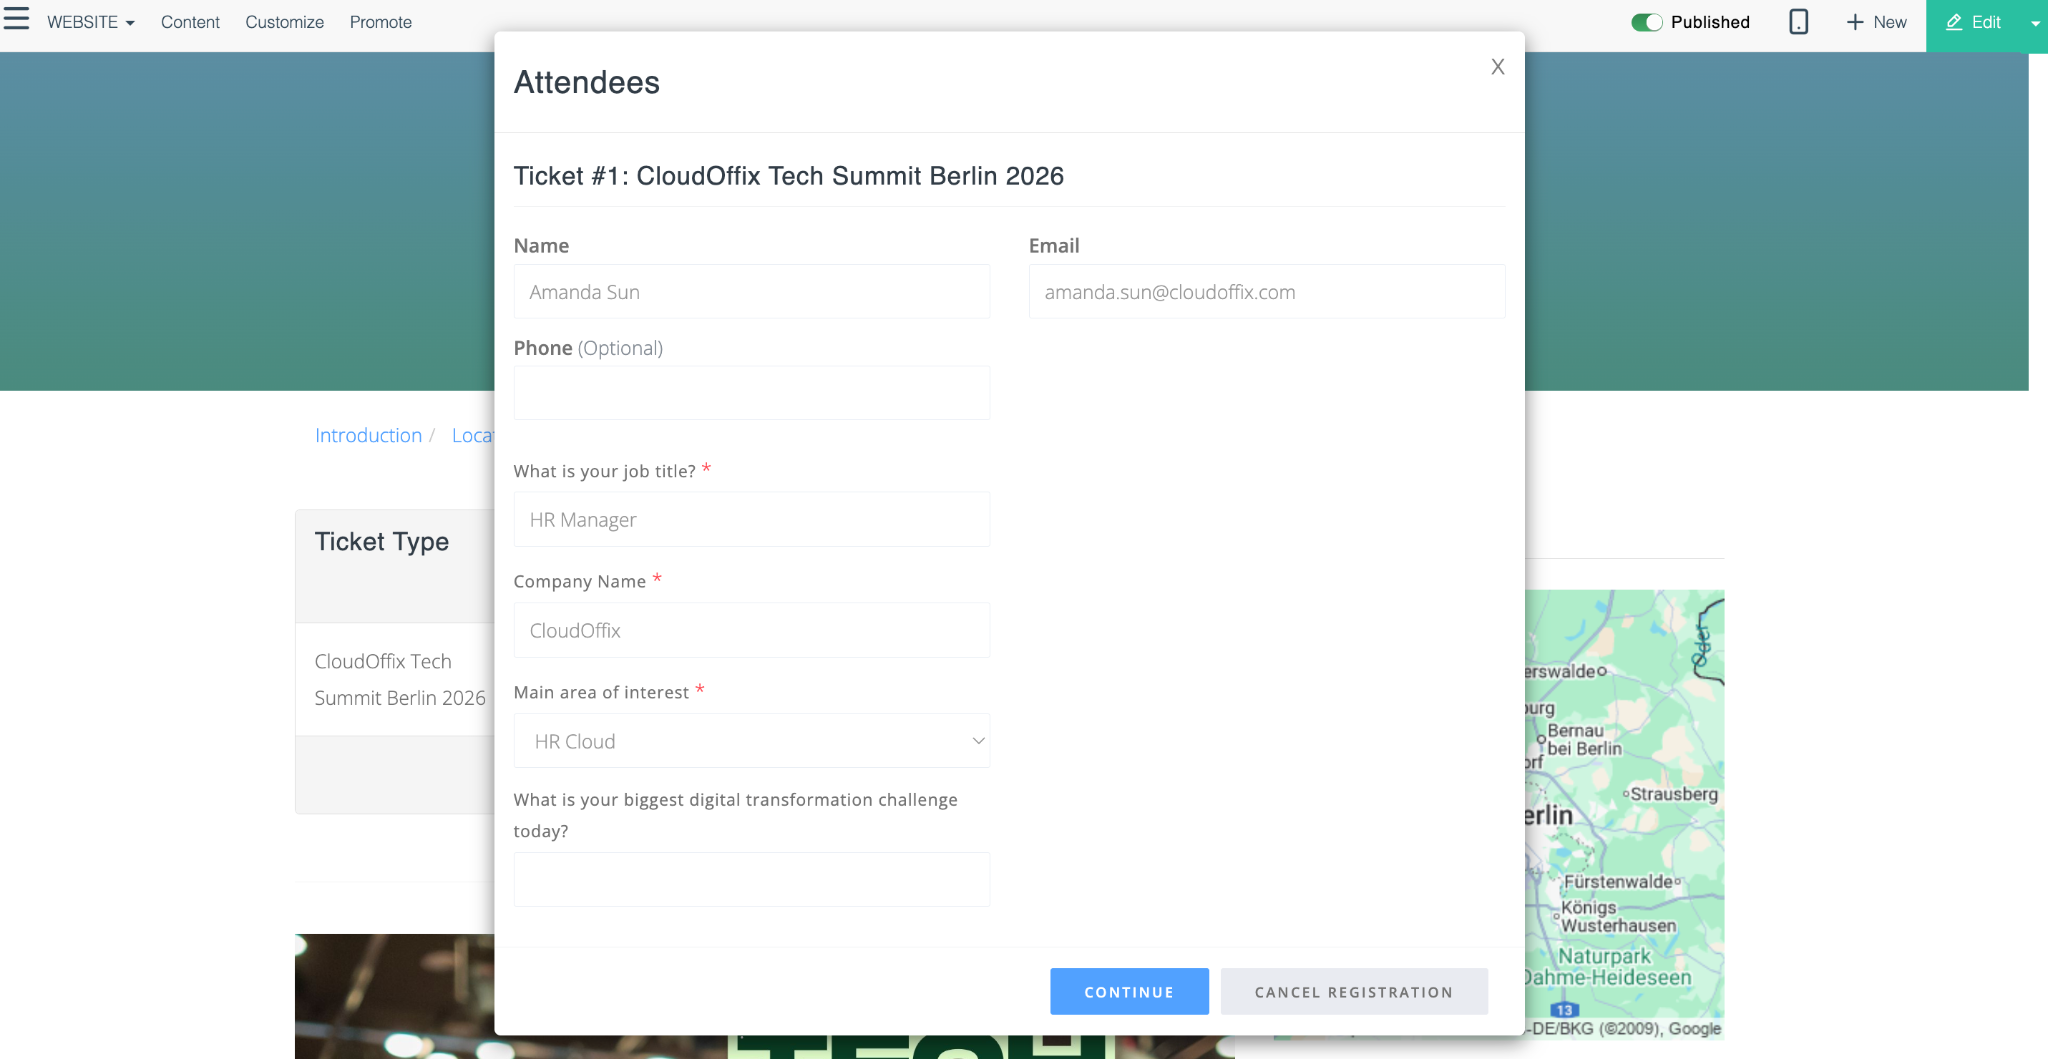
Questions tab: Collect additional information from attendees during registration.

Note: Selling tickets through the Events app automatically creates a sales order in the system for each purchase. This requires the Sales Cloud (Sales app) to be installed and properly configured.
3.3 Buttons - Event Form
Confirm Event: Marks the event as officially confirmed. This changes the event status to ‘Confirmed’.
-
Preview Badges: Opens a preview of the attendee badges.
Open the event record > Click the Attendees stat button > Click on any individual attendee to open their registration details > Click the Print button > From here you can generate badges for that specific attendee with these options:
Registration Badge: The standard single-sided name badge.
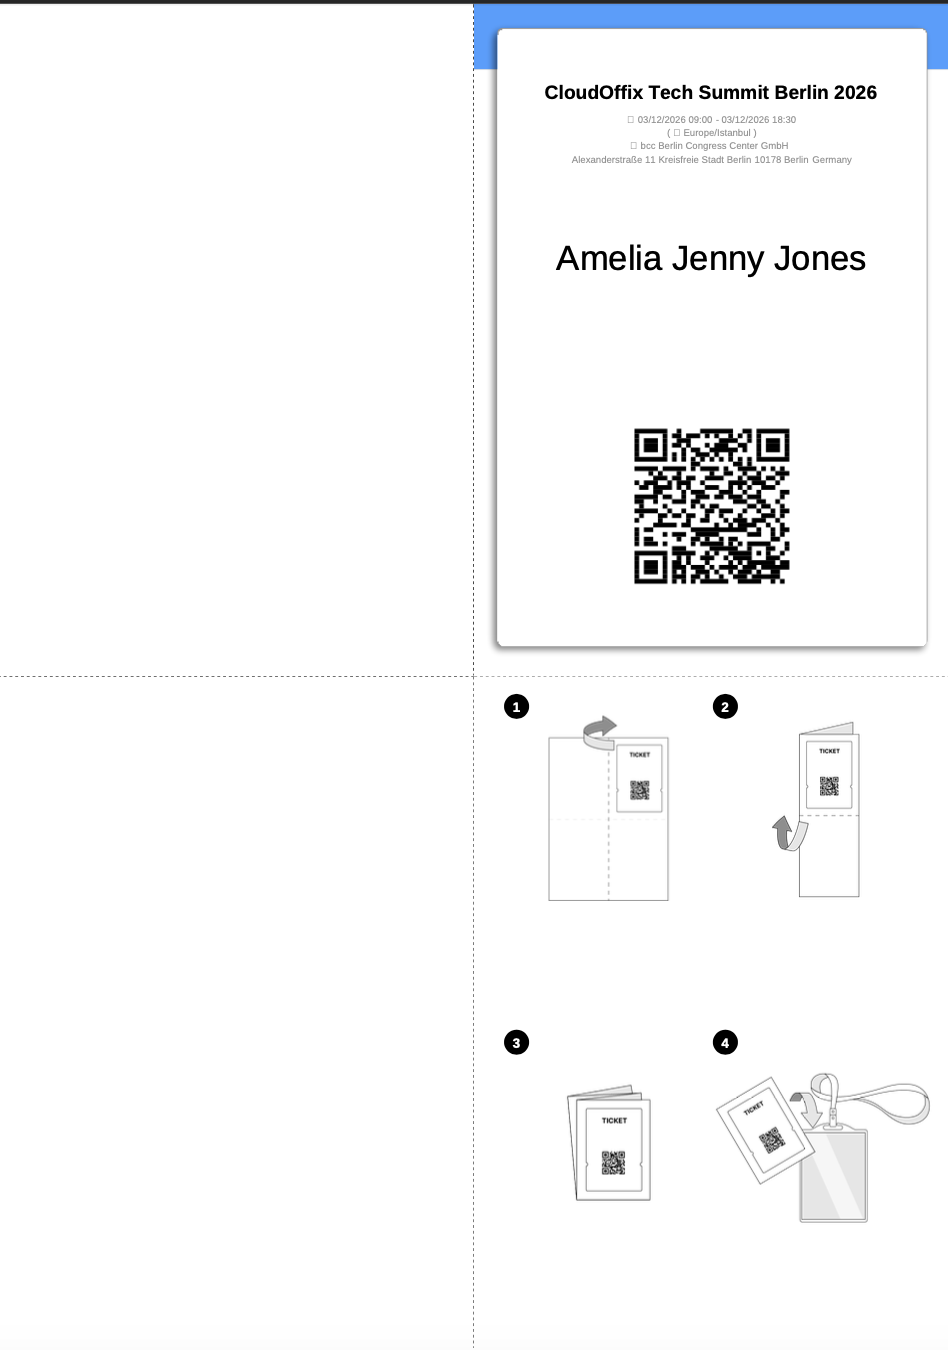
Foldable Badge: A foldable badge design (see below).
By selecting all attendees, you can create and print badges for multiple attendees at once (bulk action).
Open the event record > Click the Attendees stat button > Select attendees > Click the Print button > From here you can generate badges (e.g., registration or foldable) for the selected attendees.
Foldable Badge Example Image
Finish Event: Closes the event and marks it as completed. Sets the event status to ‘Done’.
Cancel Event: Cancels the entire event. Changes status to ‘Cancelled’.
-
Open Badge Scanner: Launches the built-in badge scanner tool (webcam or mobile camera) for quick check-in at the event door. Scans QR codes on attendee badges/tickets to mark them as ‘Attended’.
Works on laptops/tablets/phones.
Event Creation
Questions - Website view
3.4 Critical Fields - Creating Tracks
Responsible: The internal user in your CloudOffix team who owns this track/session (e.g., the event coordinator or content manager).
-
Speaker: Links to an existing contact/partner record in your database who will deliver the session.
Selecting a speaker here automatically fills in their Speaker Name, Speaker Email, and Speaker Phone (if available in their contact record).
Speaker Name: The speaker’s name.
Speaker Email: The speaker’s email address.
Speaker Phone: The speaker’s phone number.
Track Date: The exact date and start time of the session.
Duration: The length of the session in minutes or hours (e.g., 60 minutes, 1 hour 30 minutes).
-
Room: Select the room where the session takes place.
Can be chosen from the pre-defined Locations list.
Displays on the public agenda (e.g., ‘Innovation Hall’, Room 247’).
-
Tags: Add labels to categorize the track (e.g., ‘Marketing’, ‘Sales’, ‘AI’).
Tags appear on the website for filtering the agenda and help attendees find relevant sessions.
3.5 Event Categories
Create event categories with an option to pre-define everything that is usually the same for that type of event (e.g., email automations, hashtags, questions to ask attendees, etc.).

3.6 Critical Fields - Track Stages
Stage Name: The visible name of the stage
Email Template: The automated email that is sent instantly to the person when a track (session) moves into this stage.
Sequence: Numeric order that controls the left-to-right position in the kanban view (Lower number = further left)
Accepted Stage: When a proposal reaches this stage it is counted as officially accepted.
Cancelled Stage: When a proposal reaches this stage it is counted as officially cancelled.
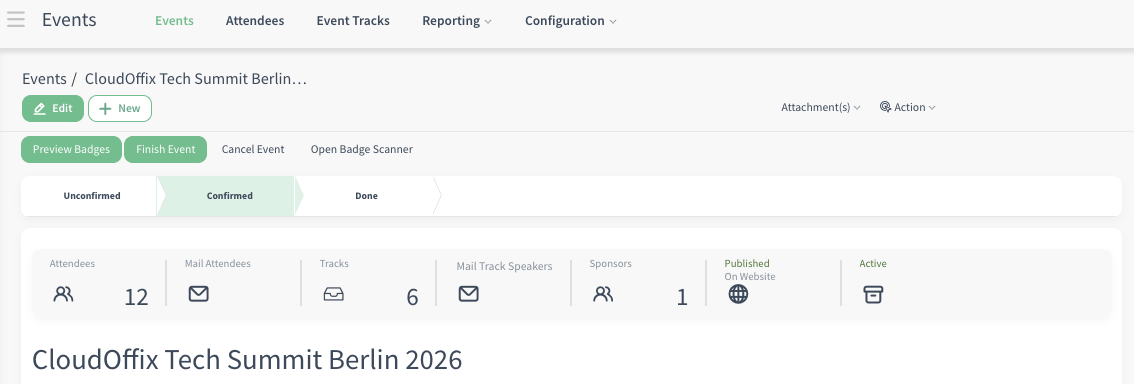
3.7 Stat Buttons of Event
-
Attendees:
Shows the current number of attendees/registrations.
Click → Opens the full list of attendees for this specific event (confirmed + unconfirmed).
-
Mail Attendees:
Send one email to all attendees of this event at once.
Clicking this button opens the email composer with recipients automatically pre-filled: all attendees of this event. You can further adjust the recipient list if needed.
-
Tracks:
Shows the number of sessions/proposals (e.g., 6 Tracks).
Click → Open all tracks/sessions of this event in kanban view (with an option to switch list view).
-
Mail Track Speakers:
Send one email to all speakers of this event at once.
Clicking this button opens the email composer with recipients automatically pre-filled: all speakers whose tracks are not in a ‘Cancelled’ stage.
The default domain filter excludes cancelled tracks so you don’t accidentally email rejected or cancelled speakers. You can further adjust the recipient list if needed.
-
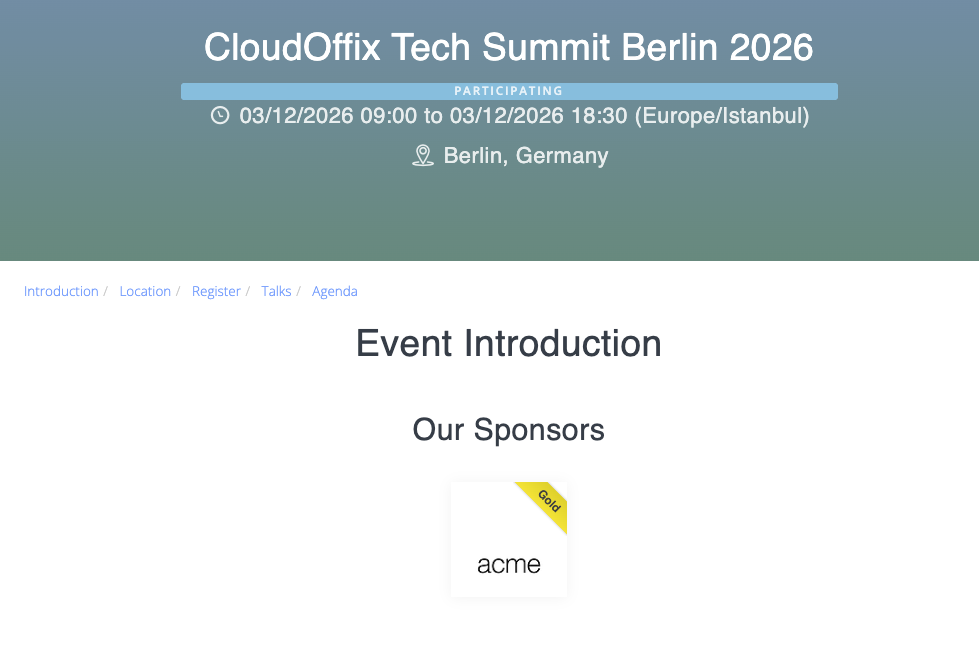
Sponsors:
Shows the number of sponsor(s) (e.g., 1 Sponsor).
Clicking it opens the full sponsor list for that event.
Select or type the sponsor’s name (Partner).
Enter their website URL.
Choose the Sponsor Type (e.g., Gold, Silver, Bronze, etc.)
Once saved and Published, the sponsor appears in the ‘Our Sponsors’ section of the public event page, styled according to their sponsor level (gets a label on the website showing the level (e.g., ‘Gold’) so visitors can immediately see the sponsorship tier).
-
Published - On Website:
To publish your event on the website, open the event record and click the globe (world) icon in the top-right corner of the form. On the website preview that opens, look at the top-right corner of the screen: you’ll see a red ‘Unpublished’ toggle. Click it once to switch the event to Published (the button turns green). The event will instantly appear on your public website.
To hide it again later, simply click the same button to toggle it back to Unpublished.
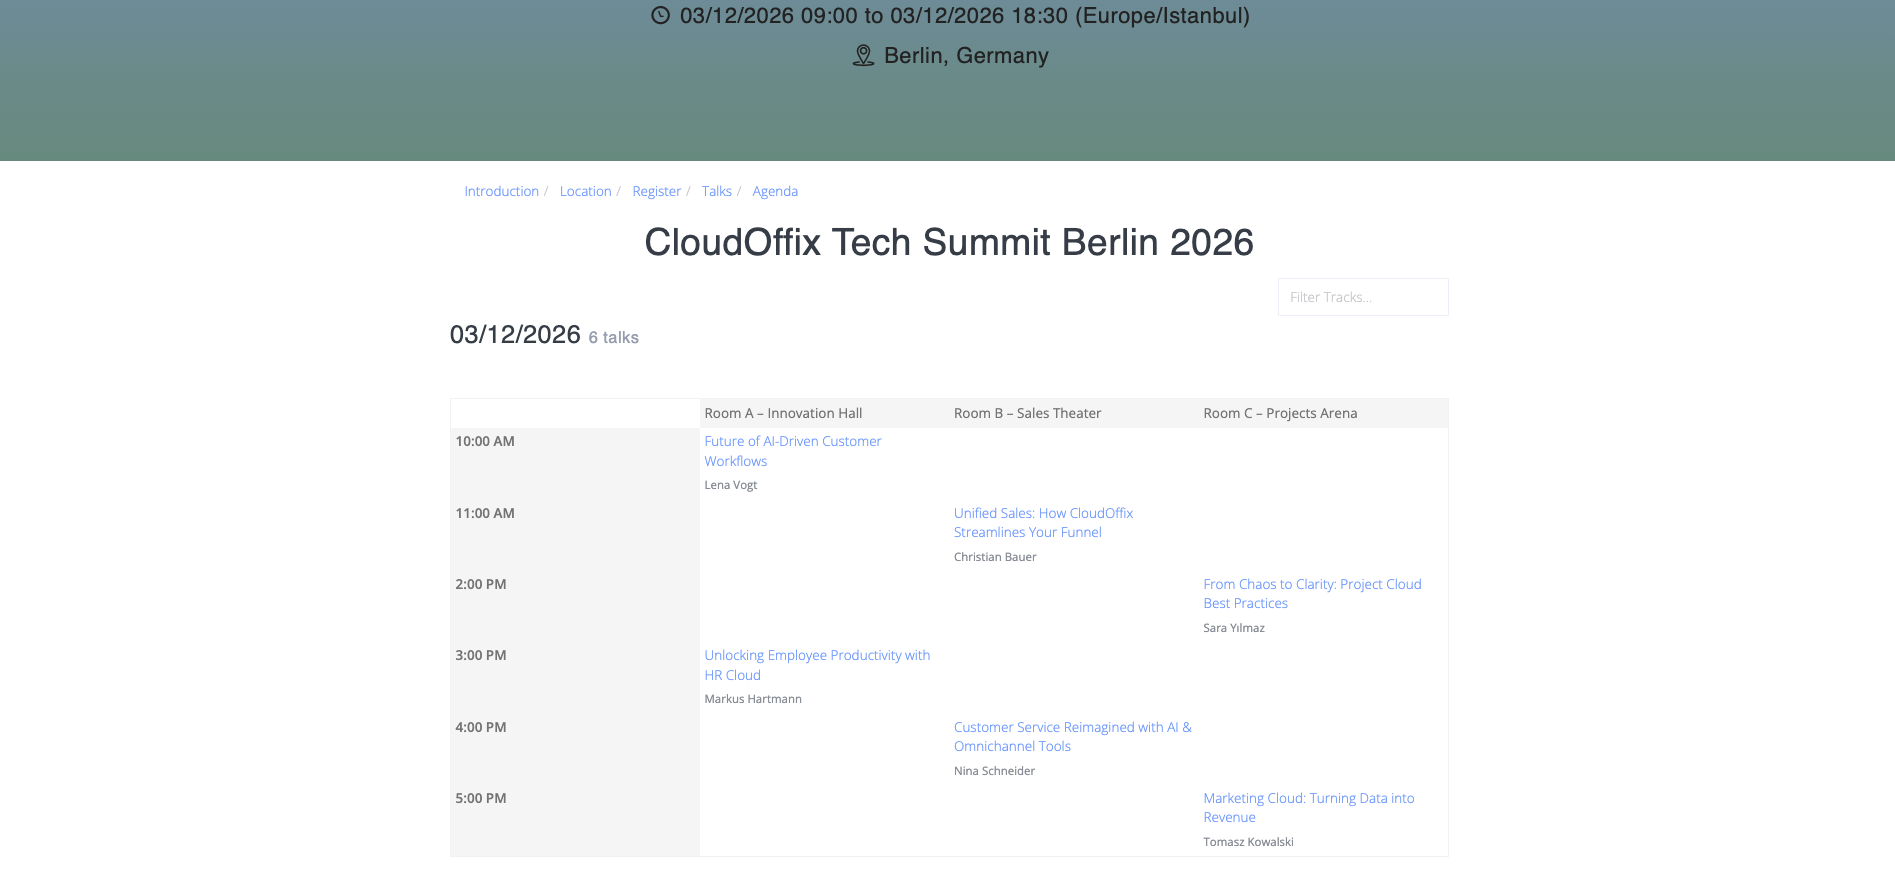
Event Tracks
Event Tracks (Agenda) - Website View
Sponsors - Website view
4. Example of End-to-End Workflow
Scenario #1: ‘Delivering a World-Class Partner Summit in Istanbul’
Early in the year, Emma, Head of Events at CloudOffix, began planning the annual Partner Summit—an flagship in-person event designed to strengthen relationships and showcase the product roadmap, and celebrate joint successes. She started by creating a dedicated ‘Conference’ category in the Events App Configuration, pre-loading all recurring elements: standard registration questions and automated email sequences, since this will be an event category that they will use in the future from now on.
With the foundation in place, she created the event record: ‘CloudOffix Partner Summit 2026.’ She entered the date and time, selected Istanbul Congress Center as the venue, set the correct timezone, and applied the Conference category so every default setting flowed in automatically.
General admission remained free to encourage broad attendance, while a limited VIP ticket provided access to an exclusive leadership dinner. Reminder and thank-you emails were scheduled, and internal team notes ensured seamless coordination with the venue and AV partners.
Corporate partners quickly committed to sponsorship. Emma added each one through the Sponsors smart button, assigning the appropriate tier and website URL. When she previewed the public page, the sponsor section displayed beautifully.
On the chosen launch date, she opened the website preview, made the last minute design changes with Website Builder, clicked the globe icon, and switched the event from Unpublished to Published. Within minutes the event appeared live on the CloudOffix website, complete with interactive agenda, session plans, venue map, registration form, and social sharing buttons carrying the official hashtag #CloudOffixSummit2026. Registrations grew steadily, reaching capacity several weeks in advance.
She decided that they could welcome 3 speakers who would like to talk at their event. So, Emma turned on Track Proposals on Website so anyone who registered could also apply to speak. A clean ‘Become a Speaker’ section appeared on the public webinar page, inviting short lightning talks or real-world case studies (5–10 minutes). Submissions flowed in steadily—success stories from current customers, creative use-cases from agencies, and bold ideas from prospects who wanted to demonstrate expertise.
In the Kanban view she dragged the strongest ones to ‘Confirmed’; the moment a proposal changed to that stage, the speaker automatically received a professional acceptance email with speaker guidelines and hotel booking link. Rejected proposals moved to ‘Cancelled’ and triggered a polite decline note. At the same time, the confirmed sessions appeared live on the public website agenda.
Throughout the final countdown, Emma used the one-click ‘Mail Track Speakers’ features to send last-minute updates and travel information. The summit itself ran flawlessly—full rooms, engaged speakers, and enthusiastic networking. Post-event surveys, sent automatically the following day with high satisfaction and hundreds of positive comments.
When Emma reviewed the final reports—attendance by country, lead quality from the event—she knew the event had not only met but exceeded expectations. Partners were already asking about 2027 before they had even left Istanbul.
To see an end-to-end marketing management in action, please refer to the following video: [ Marketing Cloud ]