
SMTP User Guide
SMTP Enhancements User Guide
The SMTP Enhancements module provides advanced control over outgoing email traffic in CloudOffix. Unlike the standard mail server configuration, this module allows you to:
- Route emails through specific SMTP servers based on the User or the Model (e.g., Sales Orders vs. Helpdesk Tickets).
- Limit Throughput (Throttling): Control the flow of emails to avoid hitting spam filters (e.g., max 50 emails/hour).
Warning: Since the system uses the permissions of the connected inbox, emails sent directly from the same inbox (e.g., via Gmail, Outlook, or other external clients) also count toward and affect these sending limits.
- Queue emails: Ensure reliable delivery without blocking the user interface.
- Retry failed emails automatically with exponential backoff.
Warning: Marketing & Mass Mailing Exclusion: By default, standard Mass Mailing (e.g., Newsletters sent via the “Email Marketing” app) bypasses this module to protect system performance.
However, the Marketing Automation (Campaigns) app has specific integration with this module. You can explicitly configure a Campaign Activity to use a specific SMTP Server (see section 4 below).
This guide details how to configure, use, and troubleshoot these features.
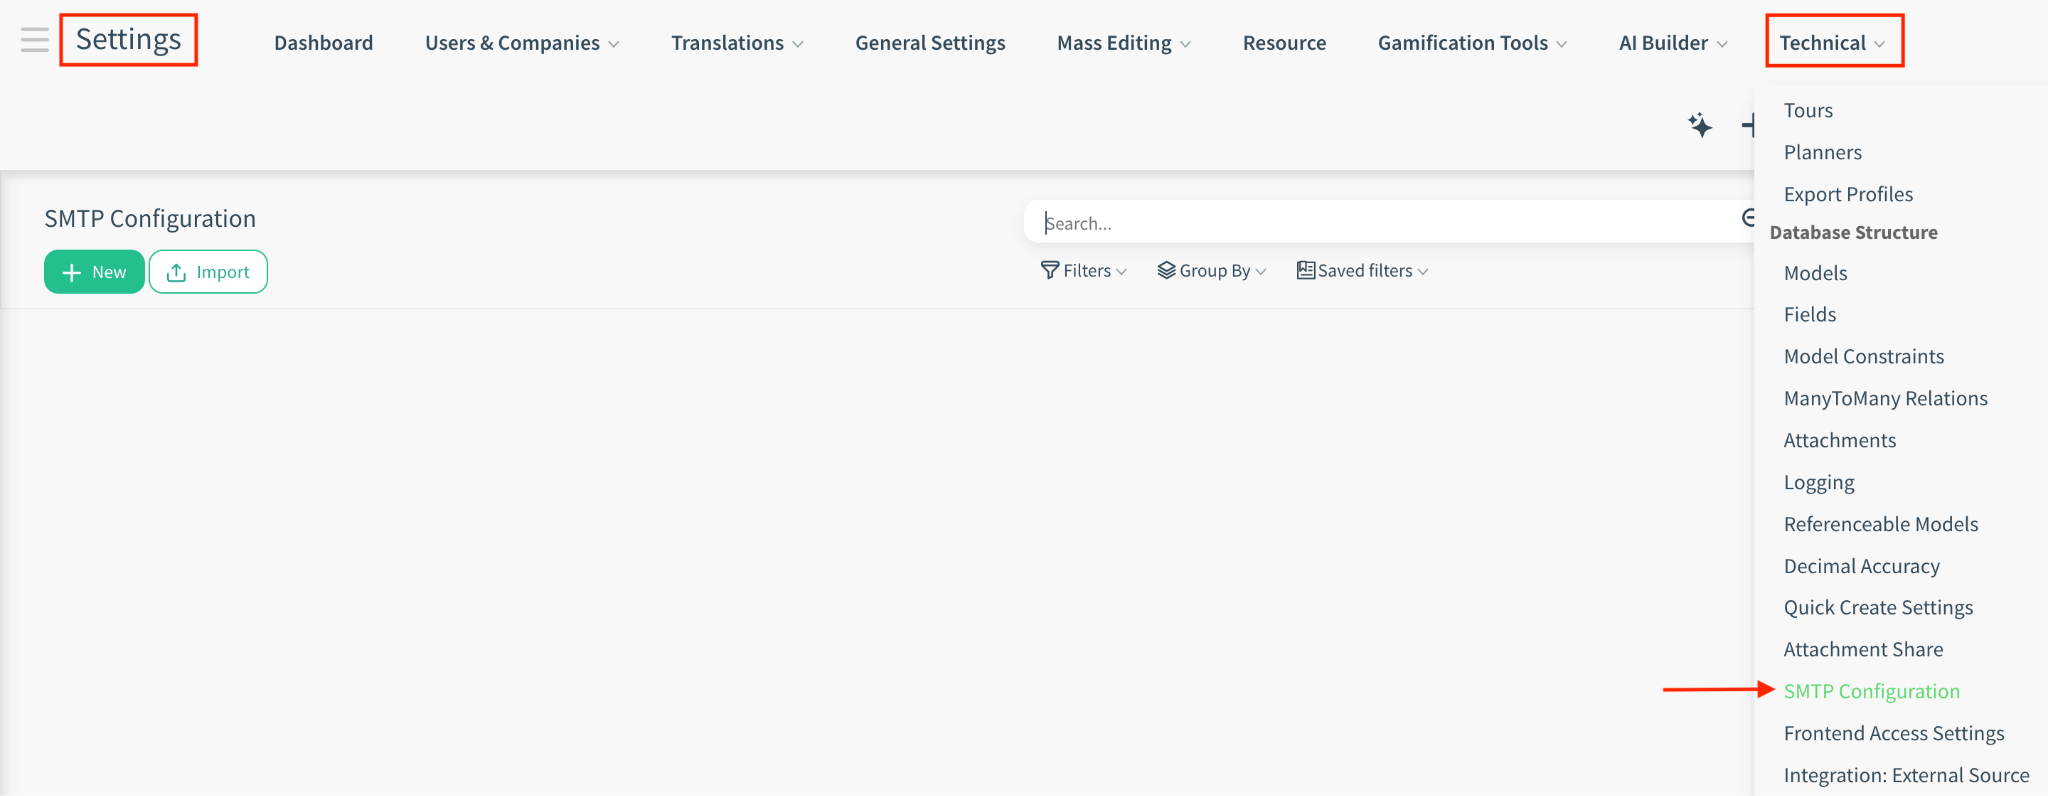
1. Configuration (SMTP Configuration)
Navigate to the SMTP Configuration menu from Settings > Technical > SMTP Configuration to set up your custom mail servers.
- Only if the user has Administration / Settings access rights can access this menu and set up the custom mail servers.
1.1 Basic Connection Settings
These settings define how CloudOffix connects to your mail server.
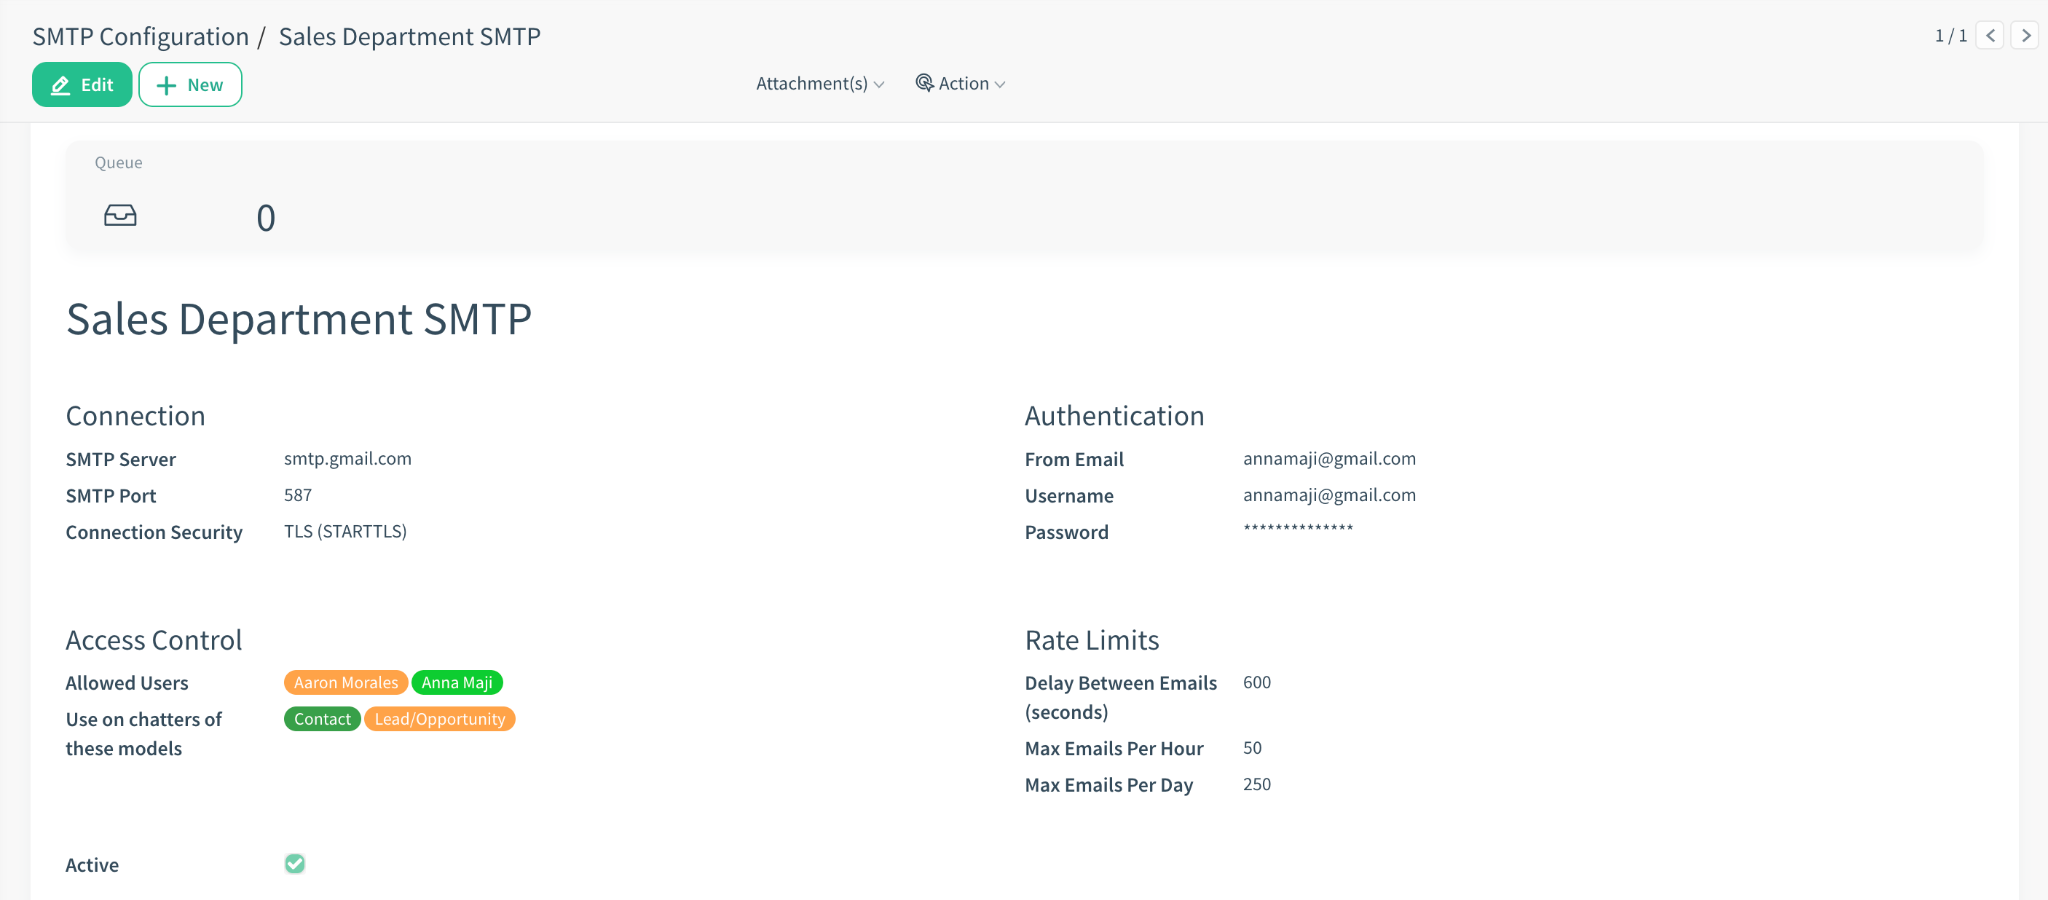
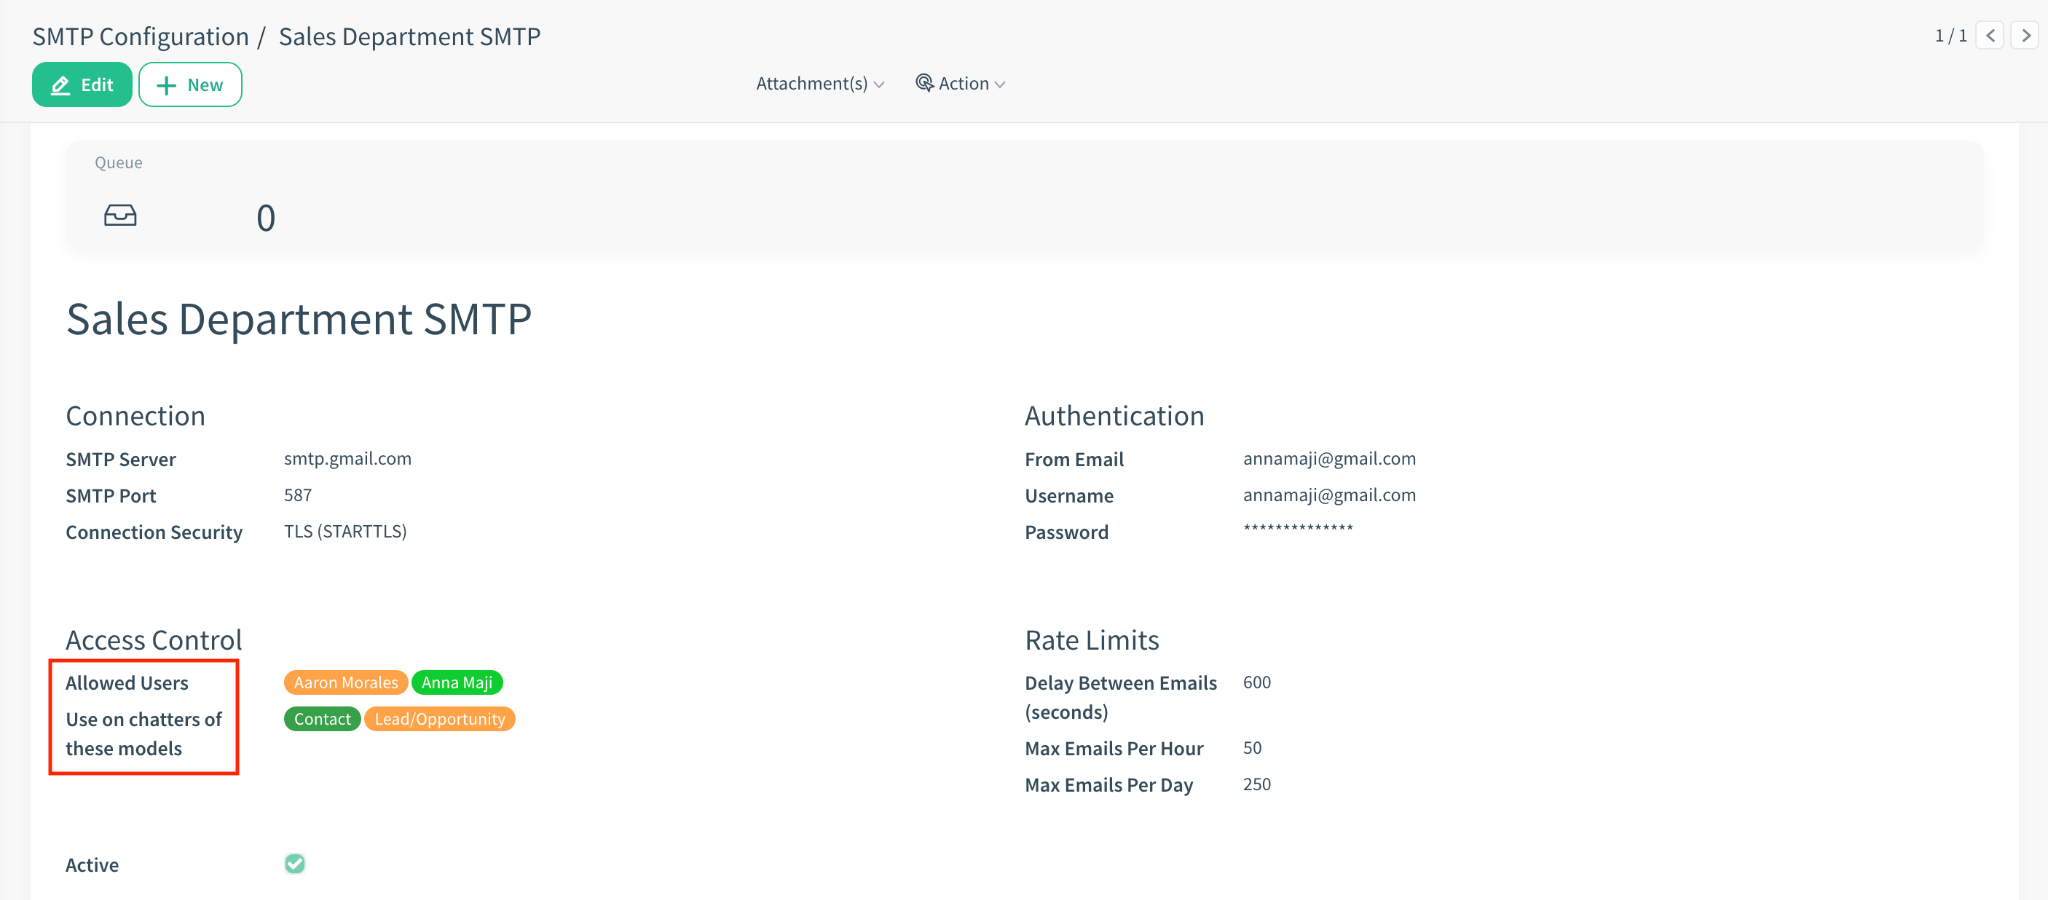
- Description: A friendly name for this configuration (e.g., “Sales Department SMTP”).
- SMTP Server: The hostname (e.g., for Gmail: smtp.gmail.com, for Dreamhost: smtp.dreamhost.com).
- SMTP Port: The port number (typically 587 for TLS, 465 for SSL, or 25 for standard).
- Username/Password: CloudOffix collects the sender’s email address and password (or provider-specific app password) during inbox connection. For most providers, the email address is automatically used as the SMTP username. No separate SMTP credentials are required; sending permissions are derived from the connected mailbox.
Email providers such as Gmail, Outlook, Yahoo, Zoho, and Yandex require an app-specific password for SMTP authentication. In these cases, the email address is used as the SMTP username. Hosting providers like DreamHost and cPanel use the mailbox password directly.
- Connection Security: Choose the
encryption method required by your email provider to ensure secure communication:
- TLS (STARTTLS): Best for modern servers (e.g., Office 365). connecting via port 587.
- SSL/TLS: Older standard, often used on port 465.
- None: No encryption (not recommended unless on a private network).
- From Email: (Optional) Force the “From” address for emails sent via this configuration.
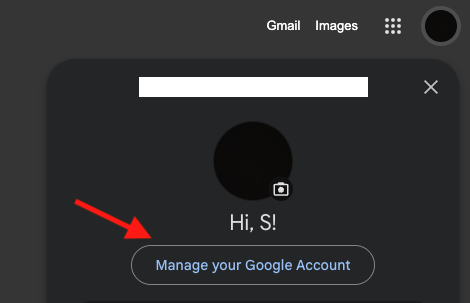
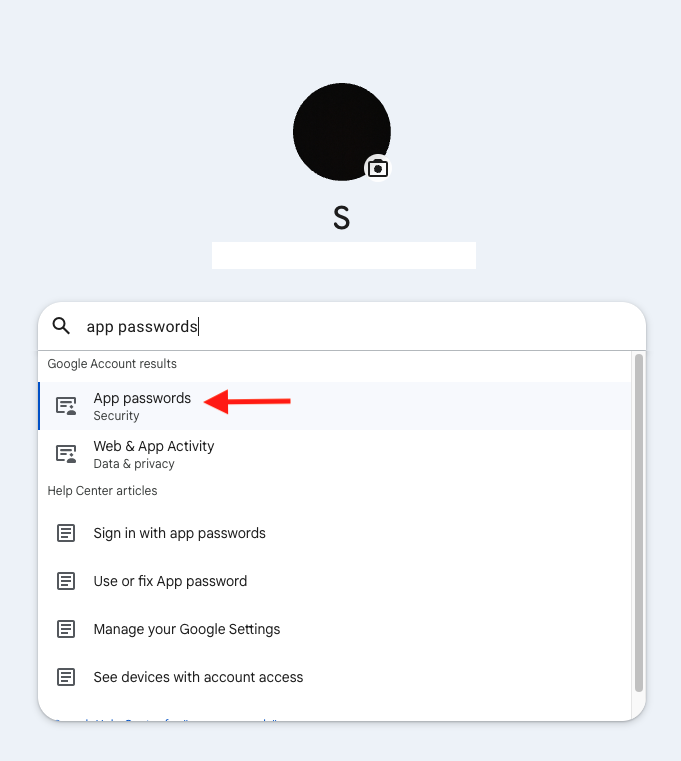
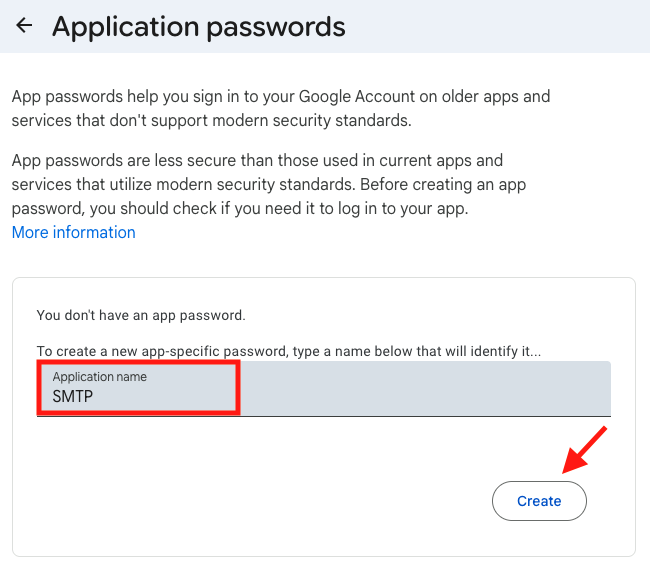
Getting App Passwords for Gmail:
Gmail accounts require an App Password for SMTP authentication.
- Enable 2-Step Verification on your Google account.
- Go to Google Account → Security → App passwords.
- Create a new app password (named as SMTP).
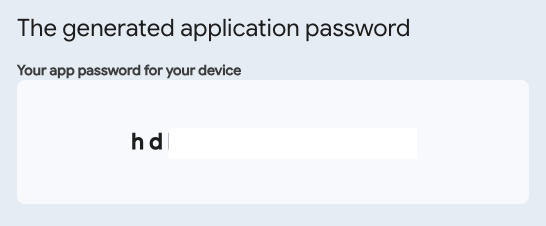
- Use the generated password in CloudOffix.
Credentials to use:
- Username: your full Gmail address
- Password: the generated app password that Google created for you
Your regular Gmail password will not work for SMTP.
Note: In some organizations, SMTP authentication or app password creation may be disabled by the administrator. In such cases, SMTP connection will not be possible.
★ TIP: Use the “Test Connection” button to verify your credentials immediately. If it fails, check the error message popup for details.
1.2 Access & Routing Rules
You can restrict or automate which emails use this server.
- Allowed Users: Defines “Who”
(which CloudOffix users) are authorized to send emails through this server. This can be used when a
single email address is shared within a team and only selected users from that team should be allowed to
send emails using this address.
Example: If you select “John Doe”, only emails sent by John will use this server. If a different user (even from the same team) tries to send an email, they will skip this configuration and use the system default. - Use on chatters of these models: Automatically triggers this SMTP server when sending emails from specific documents (e.g., select Sales Order to force all sales emails through this server).
How it works: When an email is sent, the system matches the Sender (the logged-in user performing the action) against the Allowed Users list.
- Matches the Model (e.g., sending from a Lead).
- Matches the User (Sender).
- If both match, this custom SMTP configuration is used.
- Priority Rule: If a user and model match multiple active configurations, the system selects the first one created (technically the one with the lowest ID).
- Best Practice: Ensure your configurations do not overlap. For example, avoid having two different "Sales" configurations that both allow "All Users". Be specific with your “Allowed Users” lists to avoid ambiguity.
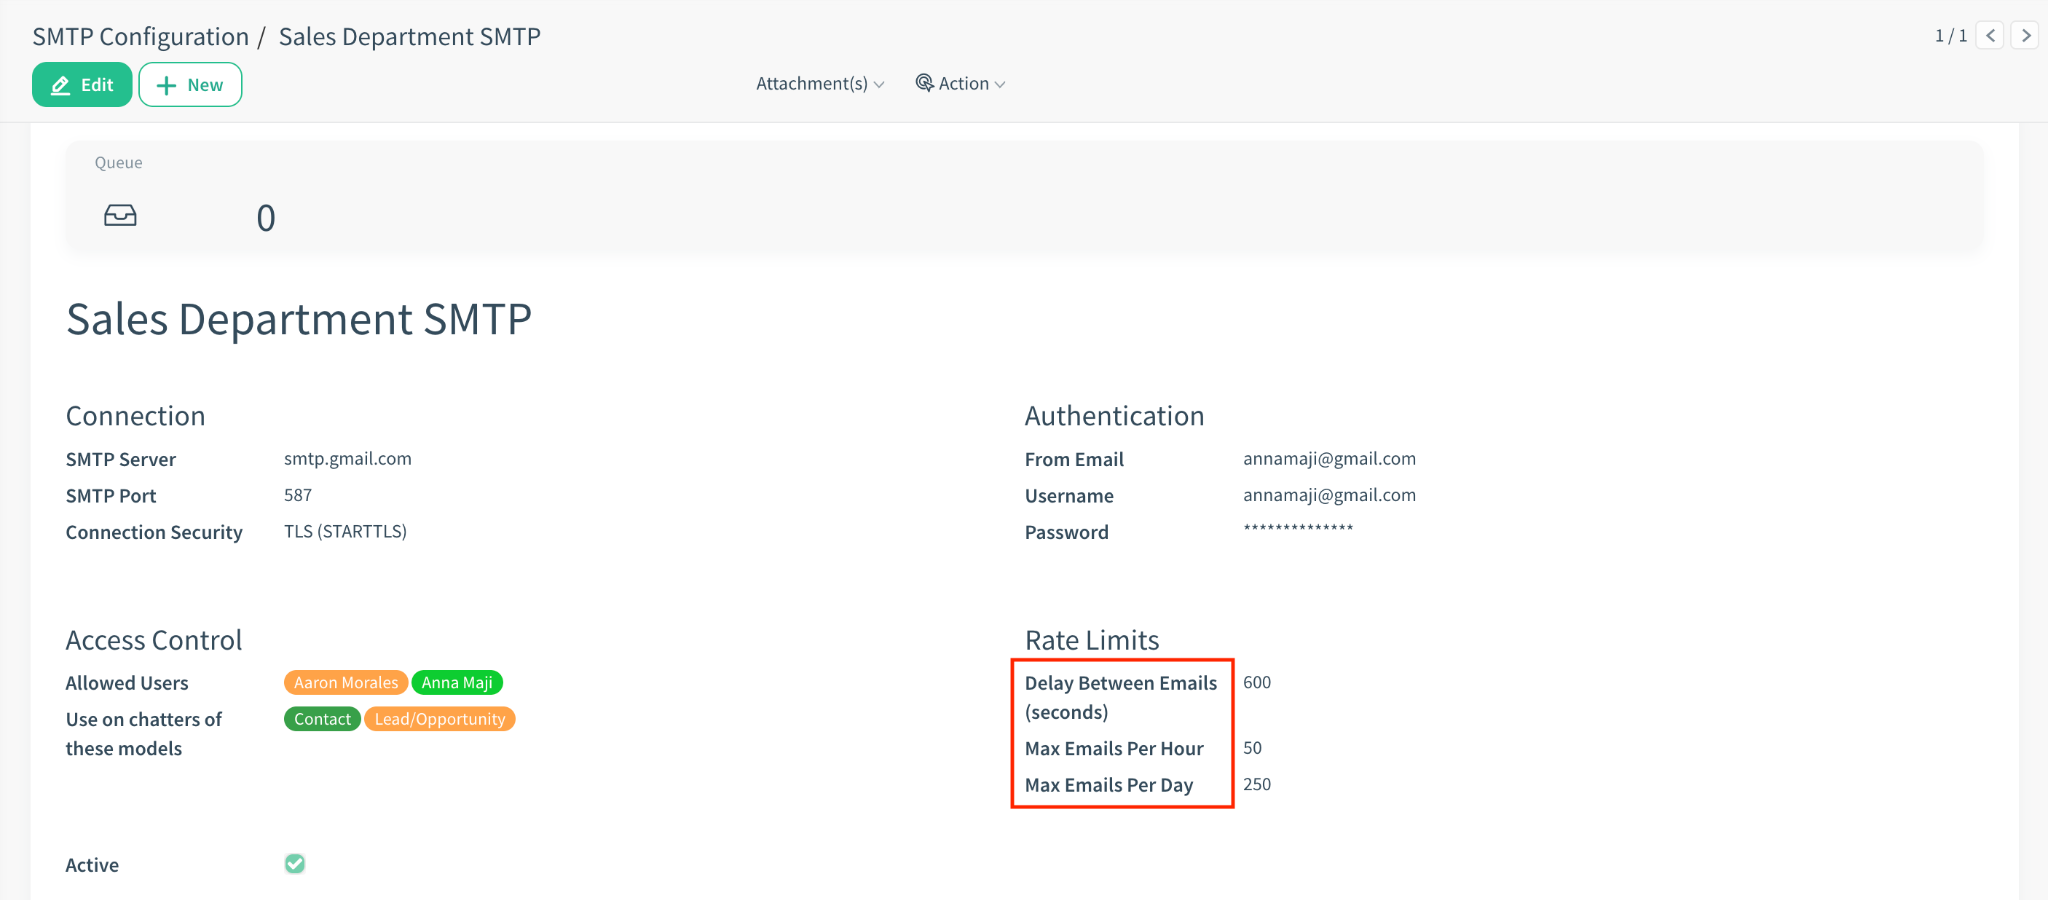
1.3 Throttling & Rate Limiting
Prevent your IP from being blacklisted by controlling the flow of emails.
Why use this?
- Some email providers (like free Gmail) block you if you send emails too fast.
- Recommendation: Using the default 600 seconds (10 minutes) is highly recommended to ensure maximum deliverability and avoid provider blocks.
- Max Emails Per Hour: Caps the hourly throughput.
- Max Emails Per Day: Caps the daily throughput.
NOTE: If a limit is reached, emails are not lost. They remain in the SMTP Queue and are processed automatically once the limit resets or time elapses.
1.4 Smart Header Rewriting (Spam Protection)
When you send an email through a custom server (like sales@mycompany.com), but the original “Sender” in CloudOffix is different (e.g., admin@mycompany.com), many email providers will mark it as “Spam”.
How we fix this:
- The system automatically replaces the technical “Sender” address with the From Email you configured.
- It ensures the “Return-Path” (where bounce alerts go) also matches this address.
- Result: The email looks legitimate to receiving servers, ensuring high deliverability.
1.5 Handling Replies (Where do they go?)
When a customer replies to an email sent via this custom configuration:
- Direct to Inbox: The reply is delivered directly to the external Inbox of the address configured in the “From Email field” (e.g. Gmail).
- Does NOT go to Chatter: Since these replies bypass the standard system routing, they will not automatically appear in the CloudOffix Chatter.
★ TIP: Forwarding Use Case: If you do want these replies in CloudOffix, you must configure Auto-Forwarding on your external email provider to forward incoming mail to your CloudOffix alias (e.g., sales@mycompany.cloudoffix.com).
2. Integration with Marketing Automation
You can force specific marketing activities to route emails through a dedicated SMTP server (e.g., using a high-reputation server for a “Welcome” series).
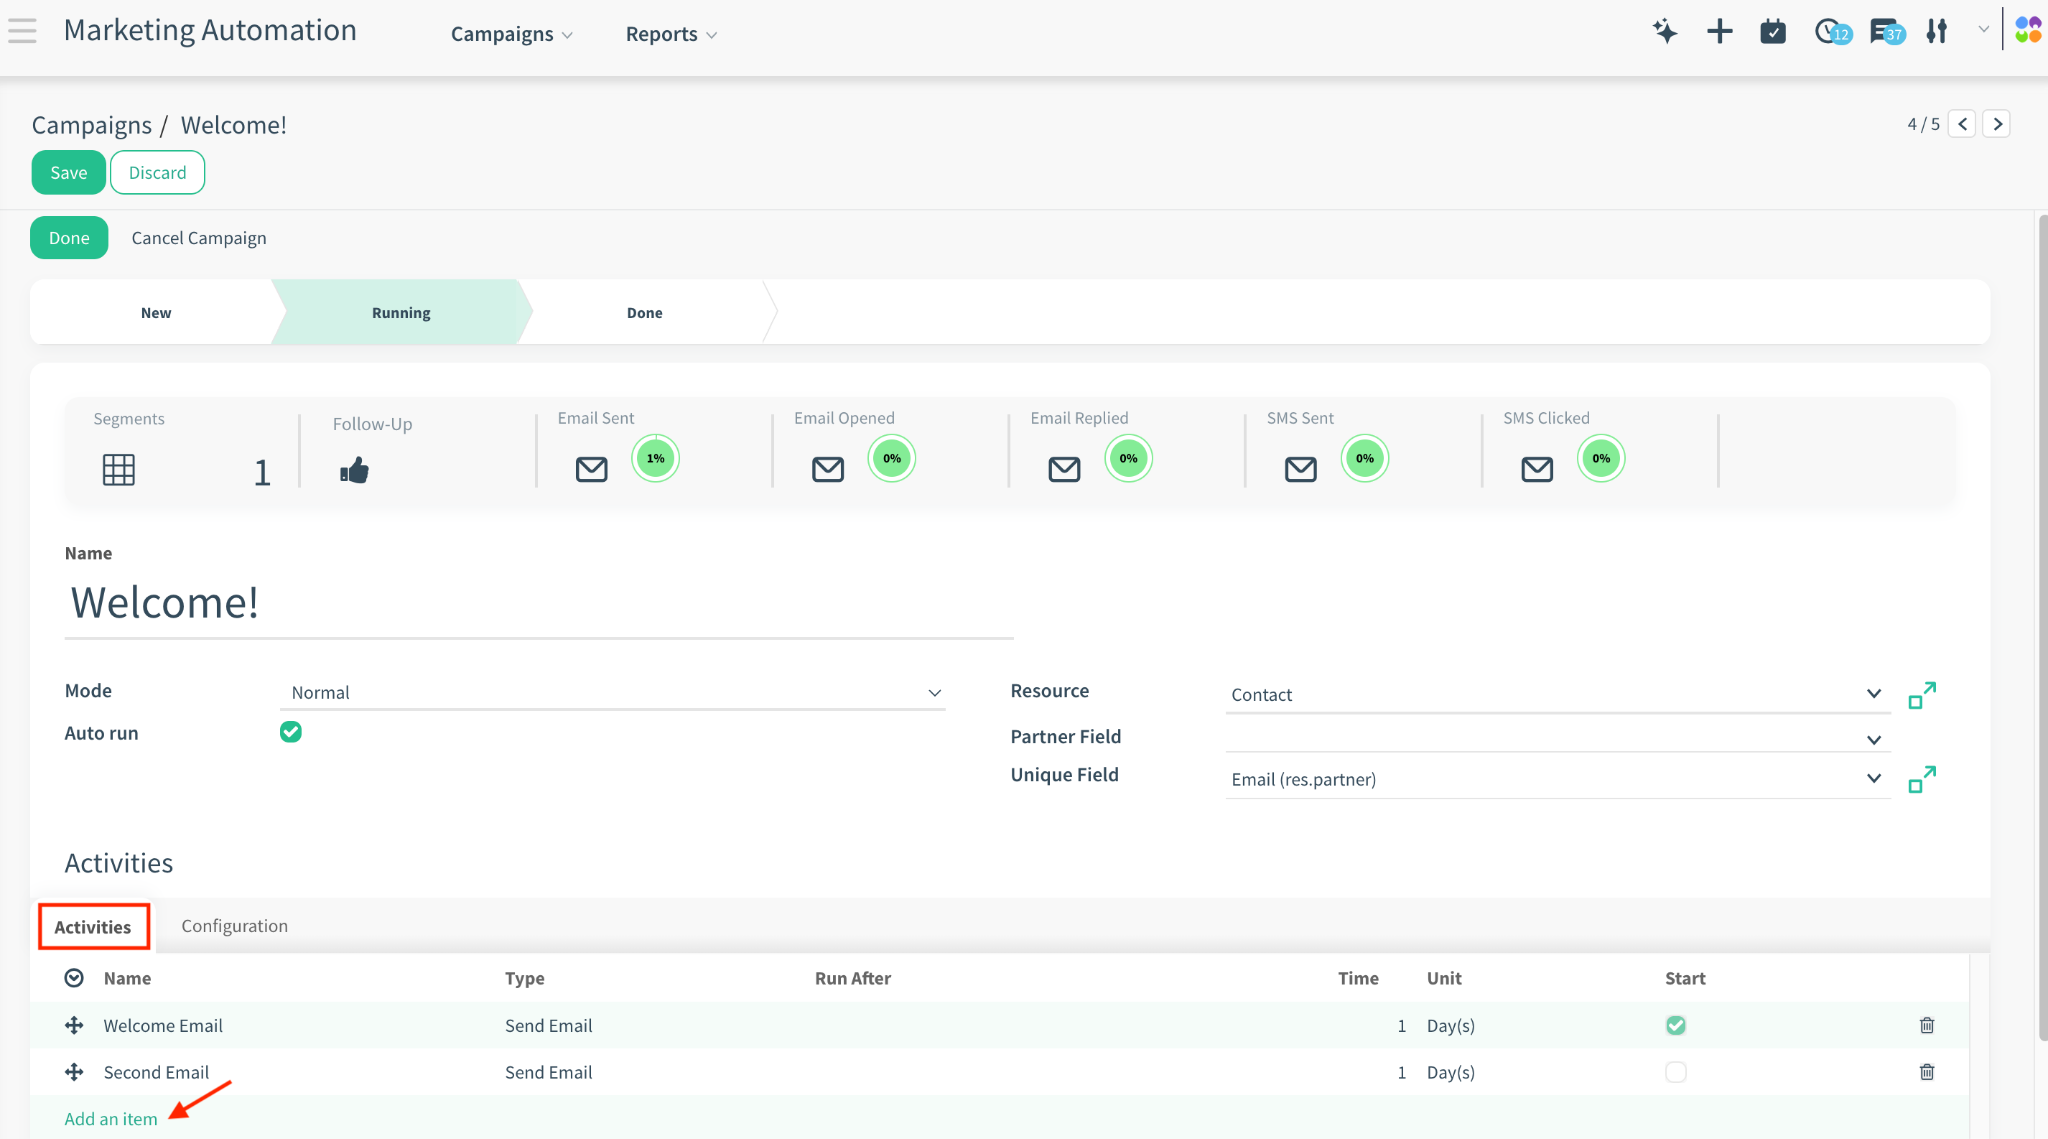
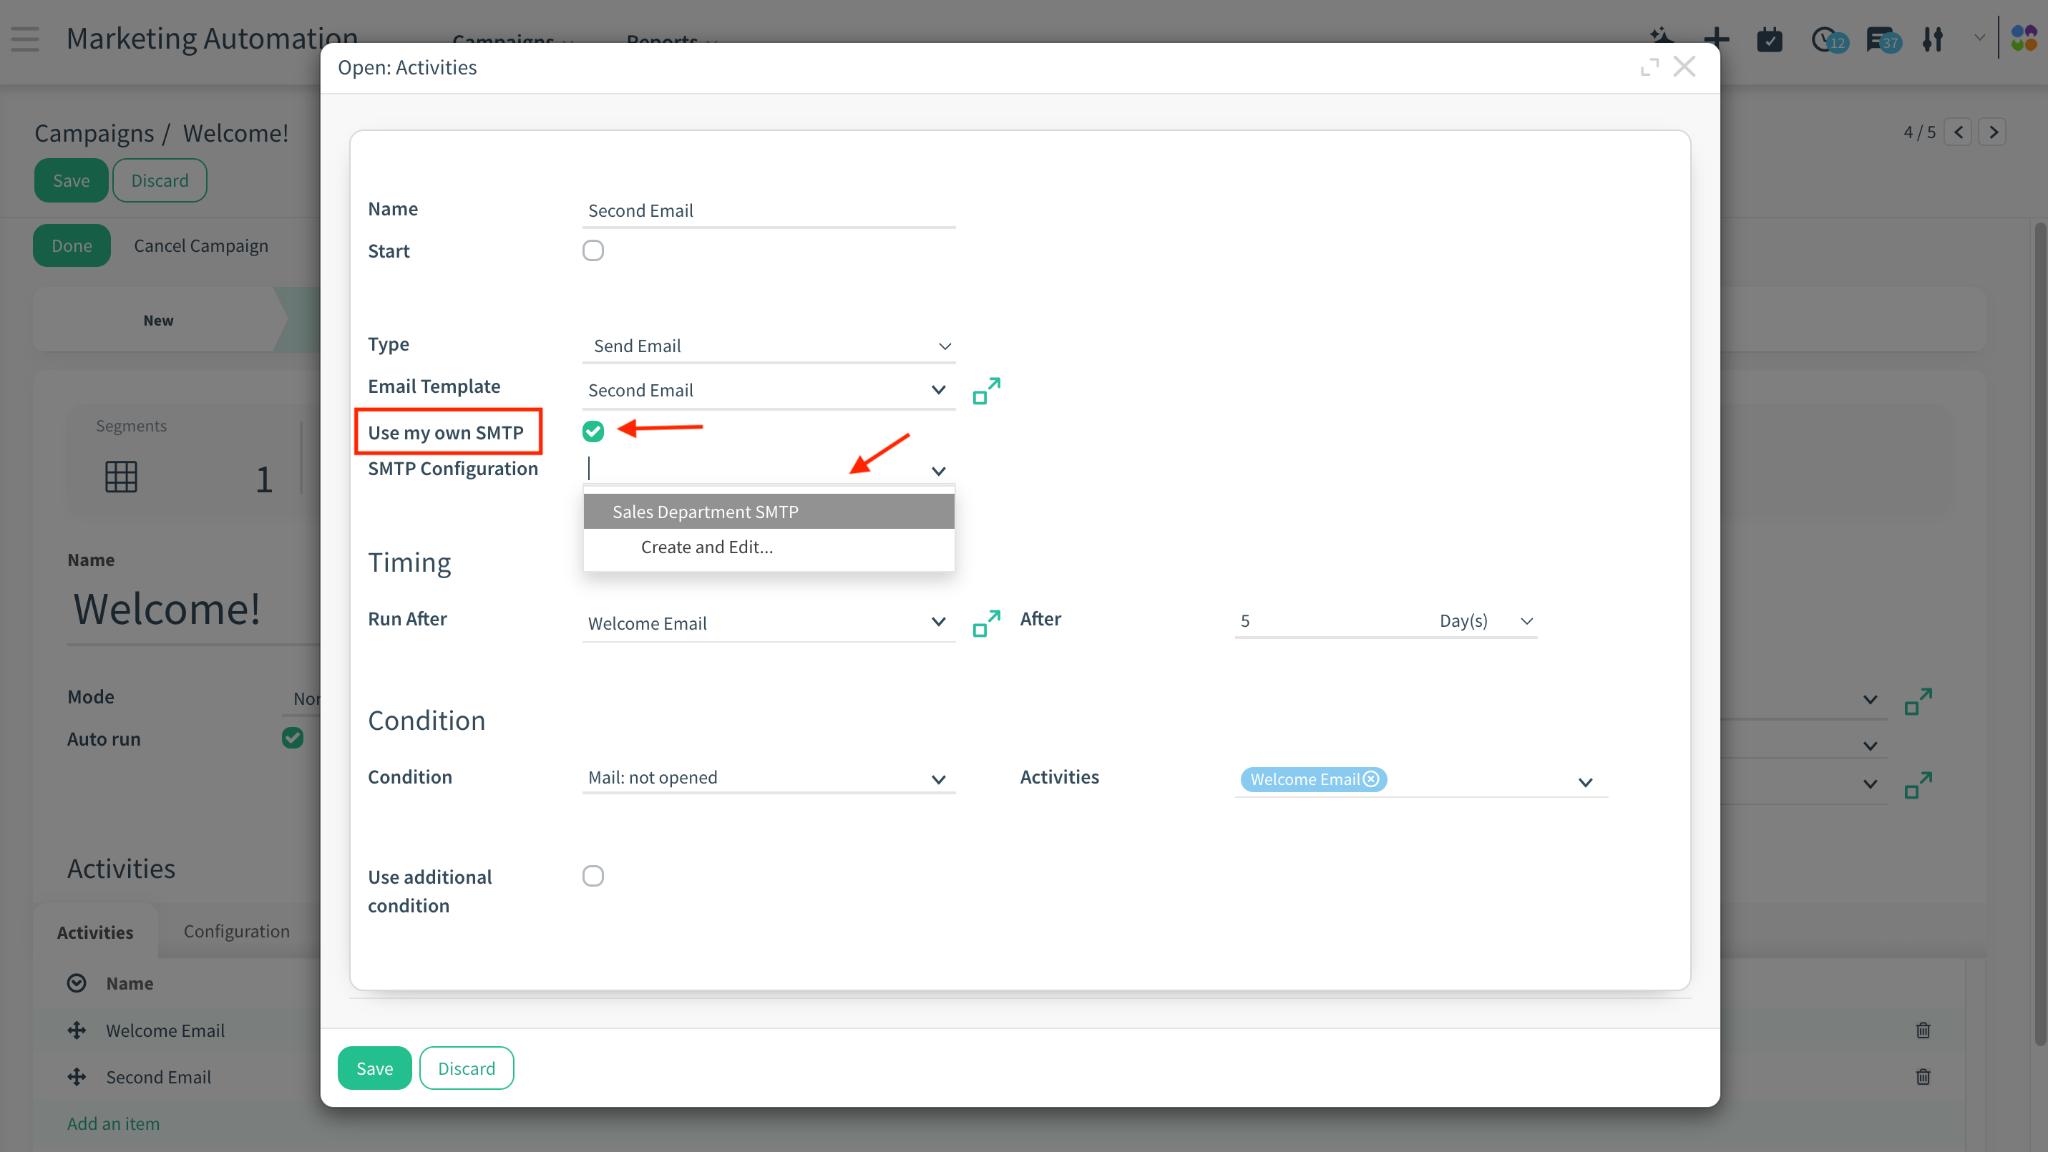
2.1 Configuration in Campaign Activity
- Open your Campaign.
- Select an Activity (Type: Email).
- Look for the “Use my own SMTP” checkbox.
- Select the desired SMTP Configuration from the dropdown list.
2.2 Behavior
- Capacity Check: Before sending, the system checks the Max Emails Per Hour/Day of the selected configuration.
- Fail-Safe: If the limit is reached, the Work Item is marked as Exception with an error message (e.g., “Hourly limit reached”). It does not queue it in the general SMTP queue; it pauses the campaign work item itself.
- Context: The email is sent using the selected SMTP server’s credentials.
2.3 Handling "Time Limits" & Schedules (Important)
Marketing Campaigns often have strict schedules (e.g., "Run only between 09:00 - 17:00").
The Conflict: If your SMTP Rate Limit (e.g., 50/hour) prevents all emails from being sent within that window:
- The excess emails will hit the limit and go to Exception state.
How to Resume:
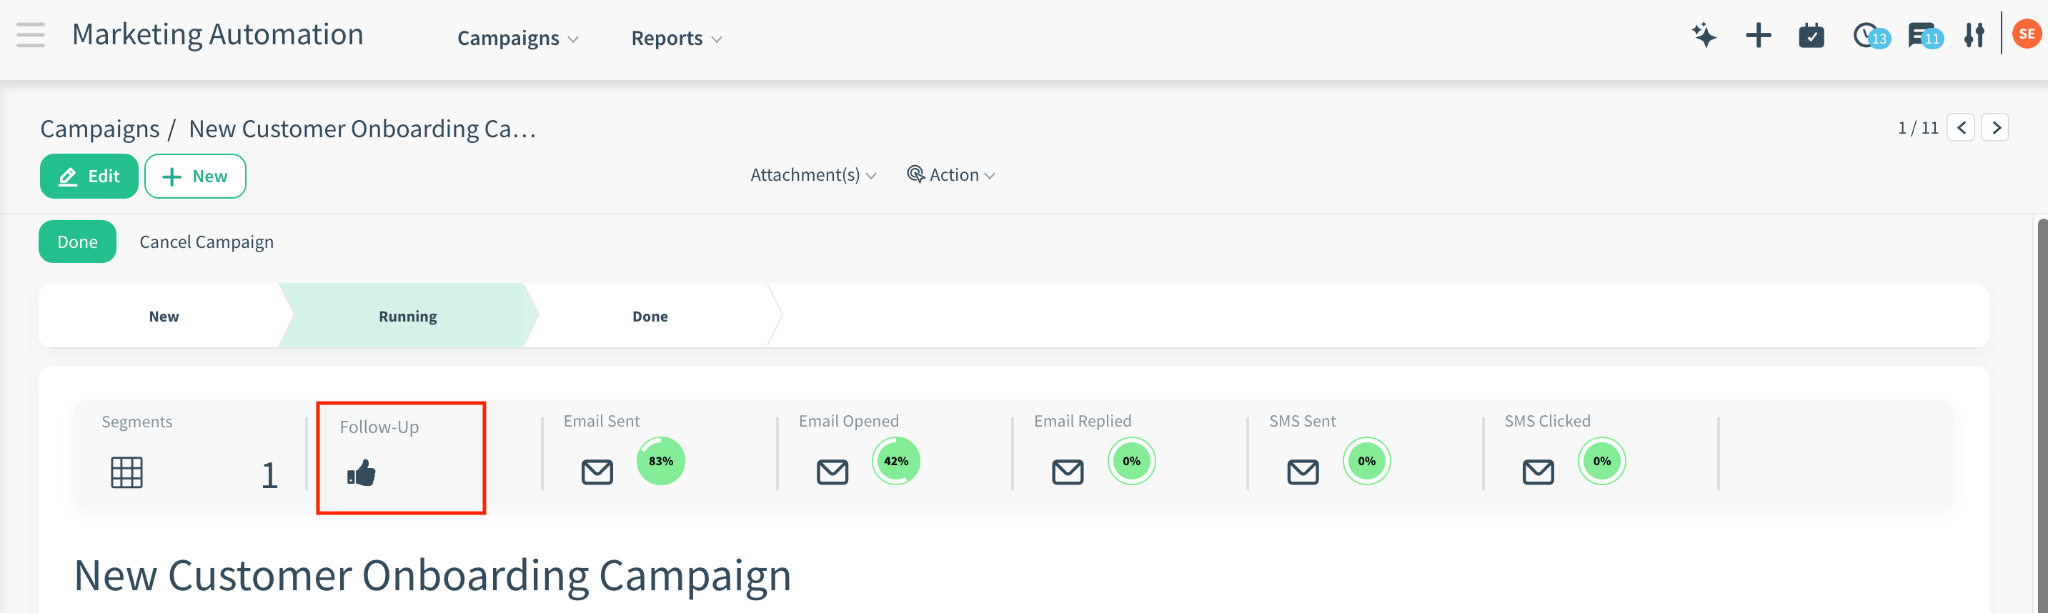
- Go to Marketing Automation > Related Campaign > Follow-up.
- Filter by Status: Exception.
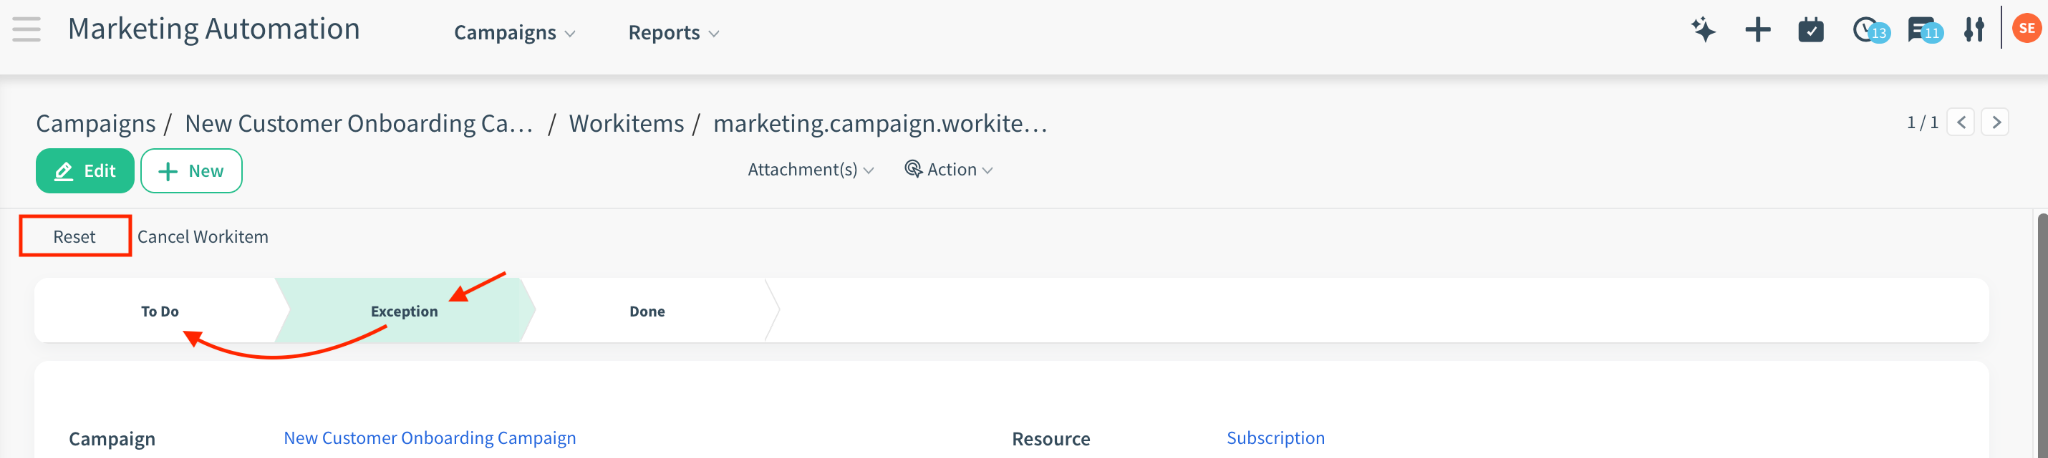
- Open the specific Workitem record.
- Click the "Reset" button in the top-left header. This changes the status back to "To Do".
The Result: When retried, the system re-checks the Campaign Schedule.
- If the time window is closed (e.g. it's now 18:00), they will wait until the window opens again (e.g. 09:00 tomorrow).


3. The SMTP Queue
Instead of sending emails instantly (which can slow down the interface or fail due to timeouts), this module uses a Queueing System.
3.1 The Decision Process (Logic)
When an email is sent, the system decides “Queue or Direct?”:
- Is it a Marketing Activity with Custom SMTP? > DIRECT but THROTTLED (Checks capacity, sends if allowed, errors if full).
- Is it a Mass Mail? (Has mailing_id or batch size > 1) > DIRECT (Standard CloudOffix Logic).
- Is there a Custom Config? (Matches Model & User) > QUEUE (Custom Logic).
- No Configuration? > DIRECT (Standard CloudOffix Logic).
3.2 Queue Process
- Queued: When an email is sent via a Custom SMTP Configuration, it is created in the queue with status “Queued”.
- Scheduled: The system calculates the next available Scheduled Date based on your throttling settings.
- Sending: A background “Cron Job” picks up due emails and attempts to send them.
- Done: Successfully sent emails are marked “Done”.
- Error: If sending fails, it enters the “Error” state.
3.3 Monitoring the Queue
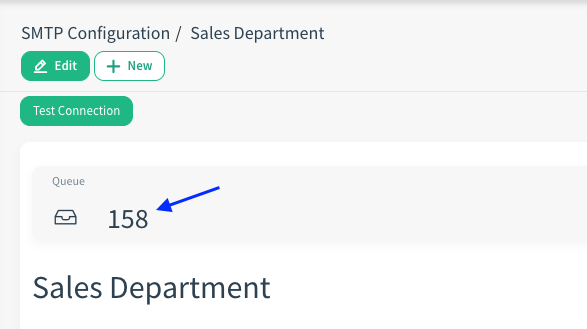
You can click the Queue Count smart button on the SMTP Configuration form to see all emails handled by that server.
- Queued: Waiting for its turn or schedule time. (Action: Wait for the cron job).
- Sending: Currently being processed. (Action: None).
- Done: Successfully sent. (Action: None - Auto-deleted after 30 days).
- Error: Failed to send. (Action: Check Error Message, then click Retry or Cancel).

4. Automation & Technical Details
4.1 Retry Logic
If an email fails to send (e.g., connection timeout):
- The system automatically schedules a retry.
- Max Retries: 3 attempts.
- Backoff: Each retry waits 5 minutes longer than the previous one.
- After 3 failures, the status becomes permanent “Error”.
4.2 The Cron Job
A system scheduled action (Process SMTP Queue) runs periodically (usually every few minutes) to process the queue.
- Default Frequency: Every 1 minute.
- Interaction with Delay:
- The Cron Job wakes up every minute and asks: "Is the delay time passed for this server?"
- Example: If you set Delay = 600 seconds (10 minutes) but the Cron runs every 1 minute:
- Minute 1: Sends Email A. Sets "Next Allowed Time" to Minute 11.
- Minute 2: Cron runs, sees it must wait until Minute 11. Do nothing.
- ...
- Minute 11: Cron runs, sees time is up. Sends Email B.
- Result: The system strictly obeys your Delay setting, even if the Cron job runs much more frequently.
- Time Limit: The job runs for a maximum of 300 seconds (5 minutes) per execution to effectively share resources.
5. Troubleshooting
- “My email is stuck in Queued
state”:
- Check your Max Emails Per Hour/Day limits. If you successfully sent 50 emails and the limit is 50, the 51st will wait until the next hour.
- Check the Cron Job. Ensure the “Process SMTP Queue” scheduled action is active.
- “I received a Connection Test Failed
error”:
- Verify the SMTP Port (465 for SSL, 587 for TLS).
- If using Gmail/Outlook, ensure “Less Secure Apps” is enabled or use an “App Password”.
- Check if the usage of SSL/TLS matches the Connection Security setting.
- “Emails are not using my Custom
Configuration”:
- Verify the Allowed Users list includes the person sending the email.
- Verify the Model matches where the email is being sent from.
- Ensure the configuration is Active.